Showing posts with label File and Printer Sharing. Show all posts

Setup LPR Printing on Vista

How do I set up LPR Printing on Windows Vista?

Printer drivers are required to be installed first, before setting up LPR, make sure the Print Server has an IP address and you are able to ping the Print Server. In this example, the Print Server has been statically assigned an IP Address of 192.168.1.54.


To locate the printer properties click on the Aero (Start) button and then select the Control Panel. Under the Hardware and Sound category select Printer


Step 1:
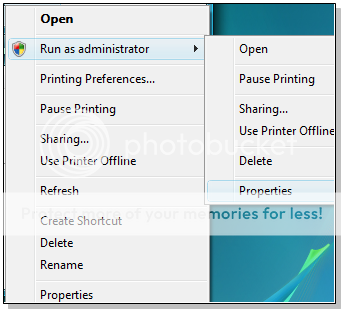
Right click over the printer icon and from the context menu select Run as administrator. You may need to right click the icon once again to view this menu screen. There are two context menus that may appear.


Now select the option Properties.


Step 2:
From the printer properties window select the Ports tab and then click the Add Port... button.


Step 3:
Select the Standard TCP/IP port and now click the New Port... button.

Step 4:
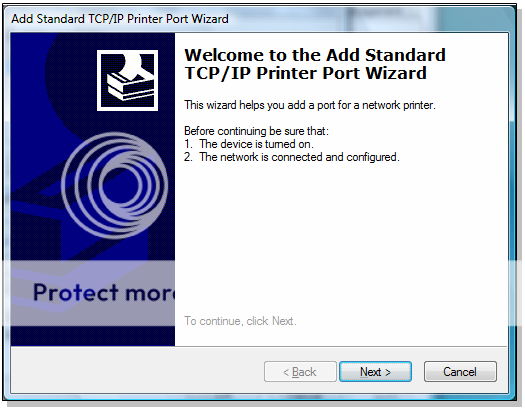
In the Welcome to the Add Standard… click the Next button.
Step 5:
Enter the IP address that was assigned to the local Linksys Print Server in the Printer Name or IP Address field box and then click Next.

Step 6:
Select the Custom radio button and then click on the Settings... button.


Select LPR from the Protocol box and in the LPR Settings you will need to give the port a queue name. e.g. WPS54G and then click OK.

Step 7:
Click Next to continue and then click Finish.


Step 8:
Close the Printer Ports window

Step 9: (Important that you follow this step)
Click the Apply button and then OK.

Step 10:
You should now be able to connect your printer to the WPS54G USB port.


Troubleshooting:
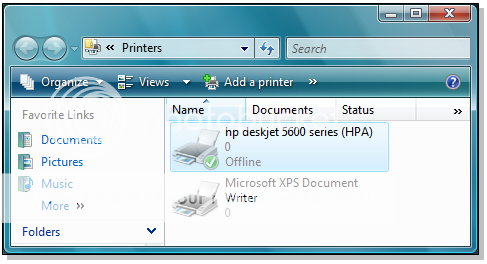
If you are still unable to print and the Printer Icon reads Offline, right click the printer icon and select the option to Use Printer Online. The printer icon will now read Ready like in Step 10.
And its done !!!

File and Printer Sharing in Windows 98/ME !

Enabling File and Printer Sharing in Windows 98/ME !


Step 1 : Click Start, Settings, then Control Panel.


Step 2 : Double-click Network and check the following under the Configuration tab:
  • Client for Microsoft Networks
  • IPX/SPX Compatible Protocol > Network Card
  • NetBEUI > Network Card
  • TCP/IP > Network Card
  • File and Printer Sharing for Microsoft Networks

NOTE: If you don't have IPx/SPx, and/or NetBEUI you'll have to click add, protocols, then Microsoft and select which ever protocol you need.


Step 3 : Under Primary Network Log On, set it to Client for Microsoft Networks.
Step 4 : Click File and Printer Sharing and make sure both boxes are checked.
Step 5 : Click the Identification tab and make sure the Workgroup name is identical on all computers on the network. Computer name has to be unique on each computer.
Step 6 : Under Access Control, make sure Share Level Access Control is checked.
Step 7 : Click OK then restart the computer.

Enabling File Sharing

Step 1 : Double-click My Computer.
Step 2 : Right-click the drive then right-click the folder you want to make available to other users.
Step 3 : Click Sharing then the Sharing tab.
Step 4 : Click Share As then enter your drive or folder name in the Share Name field. The name on Share Name may vary depending on your preference.
Step 5 : Decide which type of access you want to give other users. A Read-Only access allows other users to view the files on your PC. Full access allows users to create, change, or delete files on your system. Depends on Password allows users have Read-Only and/or Full access, depending on the password that you decide to share with them.
Step 6 : Use your mouse to select the type of file sharing access you want other users to have. If you want to assign access password(s), type them into the Password fields. When you're done, click Apply then OK. Your drive(s) can now be accessed from other users whenever they click their Windows 95 Network Neighborhood icons. If a user tries to access one of your drives that is password-protected, he/she will be asked for the appropriate Read-Only or Full access password. After the item is shared, you will see a hand appear underneath the folder or hard disk.

Sharing Printers
Step 1 : Double-click My Computer then click the Printers folder.
Step 2 : Right-click the printer you want to share with the other users.
Step 3 : Click Sharing then the Sharing tab.
Step 4 : Click Share As. Look for the Share Name field, give a name to the printer you're about to share. If you want to assign a password to the printer so only certain users can access it, enter it in the Password field.
Step 5 : Click Apply then OK. Your printer(s) are now shared.


NOTE: If you're using Windows 98/ME and want to access a Windows 2000/XP PC, you may not be able to access the shared portions of the Windows 2000/XP computer due to user right restrictions. To get around this, you may want to have the Window 2000/XP PC access the files from the 98/ME machine. Otherwise, you'll need to setup User permissions. Please remember that Linksys does not warrant this information and will not be held responsible for any software corruption as the result of this information. For more information regarding User permissions, check Microsoft’s website or contact their technical support.

File Sharing in Windows 2000 !

File Sharing in Windows 2000.

Step : 1 Click Start, Settings, then Control Panel.


Step 2 : Double-click Network and Dial-up Connections then Local Area Connection.


Step 3 : Check for the following:
  • Client for Microsoft Networks
  • File and Printer Sharing for Microsoft Networks
  • Internet Protocol (TCP/IP)
  • NetBEUI
  • IPx/SPx

NOTE: If you don't have NetBEUI or IPx /SPx please go to Step 4, otherwise proceed to Step 5.


Step 4 : Click Install and select the protocol that needs to be added:

  • NetBEUI
  • IPx/SPx Compatible Protocol


Step 5 : Click Close then Close again to go back to Control Panel.

Step 6 : When the Control Panel appears, double-click System.

Step 7 : When System Properties appears, click Network Identification then Properties.

Step 8 : Make sure the computer name you're using is a unique name and workgroup is selected, not domain.


NOTE: Make sure the computer has the same Workgroup as the rest of the network.

File And Printer Sharing

Although linksys devices do support file and printersharing, Linksys do not officially provide voice , email or chat support for the same and if you need to still configure it, do it at your own risk.


For Windows XP :


Step 1 : Click Start, then Control Panel.


Step 2 : Double-click Network Connections and look for Network Tasks in the left panel.


Step 3 : Select Set up a home or small office network to run the networking wizard.


Step 4 : Select This computer connects to the Internet through a residential gateway or through another computer on my network then click Next.


Step 5 : Once the wizard is finished, you'll have to make a floppy disk that you'll run on the other computers on the network to set them up.


Step 6 : Restart the computers. You should now be able to share files.

Ayboll