Showing posts with label Valet Connector. Show all posts

Cisco Valet Limited Warranty and Support.

Here is the much awaited post for Support and Warranty information on Valet products. This post is published on 25th September 2010. The Support and Warranty policies might change for the Valet devices in future. As of now mentioned below are the terms and conditions for Support & Warranty for the devices.


Valet Limited WarrantyCisco Valet Products come with a limited warranty that covers your hardware against defects in materials and workmanship for one year.  Complete details and limitations can be found in the Supplemental Information document on the Easy Setup Key and on the website.
    • 1 Year Limited Warranty
Valet Support
    • Online Support Resources
    • 1 Year Complimentary Assisted Support
    • Support Offerings
Valet Support
Online Support ResourcesCisco's Award Winning online support resources are available 24/7:
    • Guide Me
    • FAQ
    • Community Forums
    • Live Chat
Complimentary Assisted Support
Cisco Valet products are eligible for Complimentary Assisted Support for 1 year.  Assisted Support includes technical phone support and live chat.

Support Offerings
Rest easy, knowing that technical support is always just a phone call or click away, no matter how long you’ve had your product.  Our award-winning phone support and web-based resources can get you back up and running even beyond your Complimentary Assisted Support period. 

Phone Connect (US only)
Talk with one of our expert phone technicians.  They’ll help you set up or troubleshoot your home network over the phone.  We’ll make our best effort to resolve your problem.  
    • One-time phone call (no time limit)
    • The technician will try to resolve your problem
    • One-time Phone Connect call: $29.99
Phone Connect-6 (US only)
Have you ever thought of that perfect question just after you hang up with the service technician?  With Phone Connect-6, that’s not a problem.  Phone Connect-6 lets you make up to 6 phone support calls within a six month period (whichever comes first).  That means you can call back up to five times within six months for no additional charge!
    • Up to 6 technical support phone calls for six months (whichever comes first, starting on the date of your first call)
    • Program covers a single device
    • The agents will try to resolve your problem
    • Up to 6 calls or six months (whichever comes first): $39.99

For better performance in Range and Connectivity, use the Valet Connector with the Cisco-Valet Plus Wireless Router.

How to upgrade firmware for Valet or Linksys E-Series.


Always upgrade the firmware or any linksys device with the computer connected with an ethernet cable to the Router / Modem / Access Point / Range Expander or any other device.

A firmware upgrade is recommended on the Valet or Linksys E-Series if you are experiencing the following:
- Intermittent or slow performance
- Your Valet or Linksys E-Series freezes unexpectedly
- Your Internet connection frequently gets disconnected

Follow these steps to upgrade the firmware.

Step 1:
Using your preferred Internet browser, navigate to http://homesupport.cisco.com.

Step 2:
Once you’re on http://homesupport.cisco.com, enter the model number of your product, in the Search Support field located on the upper left corner of the page. Click on the arrow icon to continue.


Step 3:
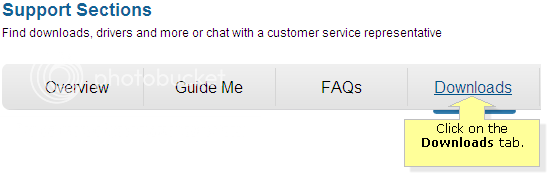
On the next page, click on the Downloads tab under Support Sections.


Step 4:
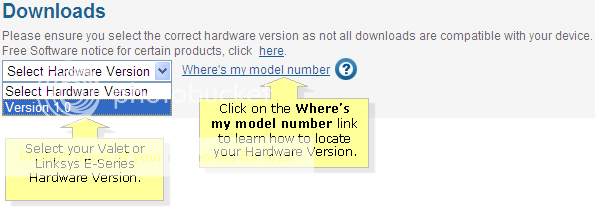
Select your Valet or Linksys E-Series hardware Version from the Select Hardware Version drop down menu.

NOTE:
It is important that you select the correct Hardware Version for your Valet or Linksys E-Series product. Click on the Where’s my model number link to learn how to locate your Hardware Version.


Step 5:
After selecting your Hardware Version, click on the Download link under the Firmware section.


Step 6:
A File Download window will now appear. Click on the Save button.


Step 7:
In the Save As window that appears, specify a folder or location to place the file in, then click on the Save button at the bottom right.


Step 8:
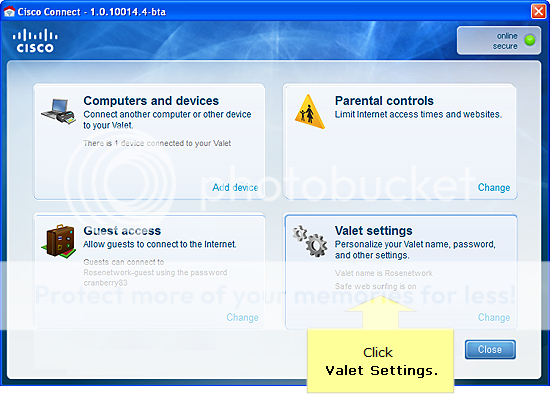
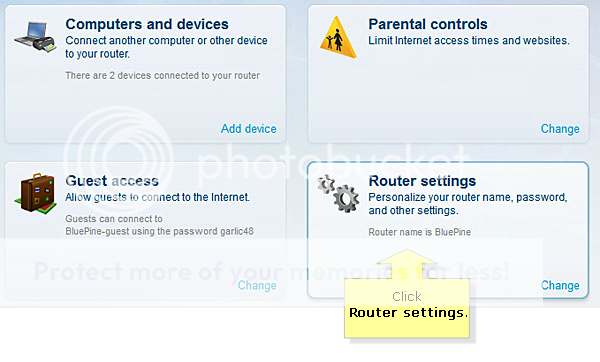
Once you have downloaded the firmware, launch Cisco Connect. Click Valet settings if you’re using a Valet, or Router settings if you’re using a Linksys E-Series.

NOTE:
To launch Cisco Connect on a Windows computer, go to Start>All Programs>Cisco Connect.
             To launch Cisco Connect on a Mac computer, navigate to the Applications folder in Go, and then start Cisco Connect.


Now you have the firmware so follow the steps below
Step 1:
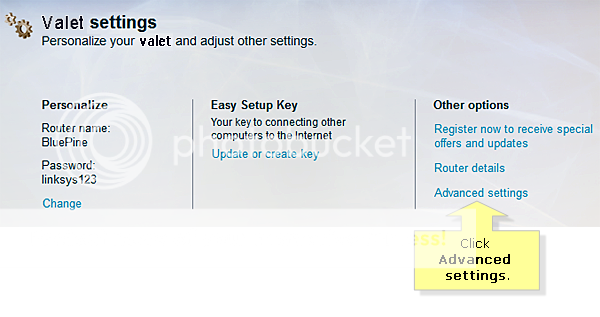
When you see the Router settings or Valet settings screen, click Advanced settings.


Step 2:
At the Advanced settings screen, click Copy password then click OK. It will bring you to the Web-based utility of your Valet or Linksys E-Series.


Step 3:
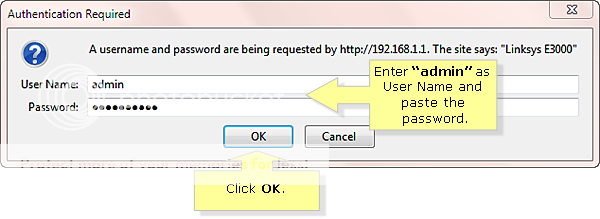
When you are prompted for User Name and Password, enter “admin” as User Name and right-click and select Paste to paste the password you have copied earlier. Then click OK


Step 4:
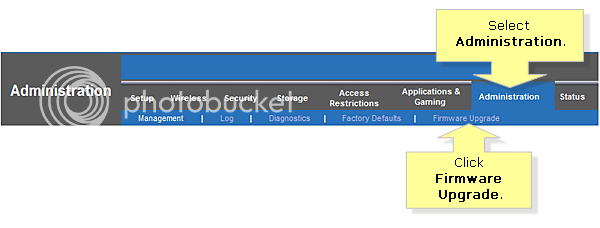
You will now see the Web-based utility. Select Administration and click Firmware Upgrade.


Step 5:
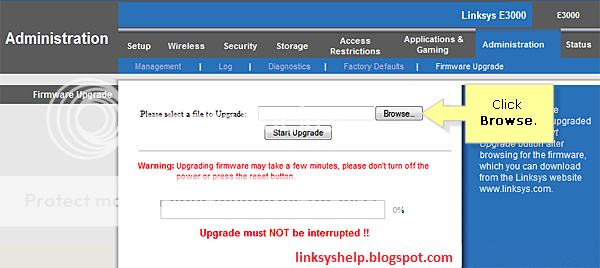
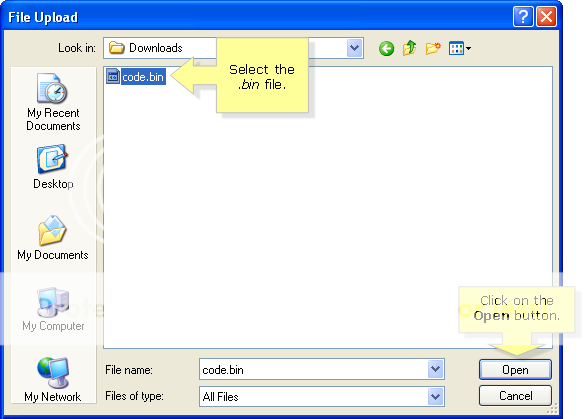
To start firmware upgrade process, click Browse and select the .bin file that you downloaded earlier.


Step 6:
After selecting the .bin file, click on the Open button at the bottom right.

NOTE: The file name may vary based on the product model.


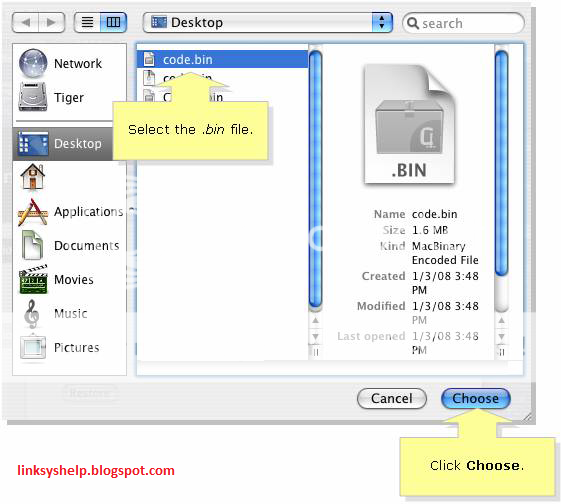
NOTE: If you are using a Mac, your screen should look similar to the screenshot below. Select the .bin file and click on the Choose button.


Step 7:
After selecting the file, click Start Upgrade


Step 8:
Once the upgrade is successful, the following message will appear:

Cisco Valet Connector Info.

Valet Connector Wireless Adapter

The Valet Connector Wireless Adapter lets you enjoy the Internet without the hassle of messy cords. Use the Valet Connector to provide a fast and reliable wireless connection to non-wireless desktop and laptop PC computers. Simply plug the Connector into your computer's USB port to launch pre-loaded software, follow a few simple on-screen steps, and your computer is now wireless.


The Valet Connector provides a reliable wireless connection to non-wireless desktop and laptop PC computers.

Key Features

  • Provide a wireless connection to your non-wireless desktop and laptop PC computers
  • Enjoy the speed and range of Wireless-N
  • Get set up easily: insert your Valet Connector into the USB port of your wired device, and you'll be wirelessly enabled in just a few minutes
  • Enjoy wireless on-the-go: take your pocket-sized Valet Connector with you to connect your laptop to hotspots at coffee shops, hotels, and airports
  • Makes a great addition to homes with a Valet wireless router


Get Connected

The Valet Connector lets you enjoy the benefits of your wireless home on your non-wireless laptop and desktop PC computers. Use the Valet Connector to provide a fast and reliable wireless connection to your wired PCs, so you can surf the Internet, check your e-mail, and print wirelessly--without having to bother with messy cords.

Set Up in Minutes

Your Valet Connector makes it quick and easy to provide a wireless connection to your wired device. Just insert your Valet Connector into the USB port of your non-wireless computer to launch pre-loaded software. Then follow a few simple on-screen steps, and your computer will be connected wirelessly in minutes. It's that easy.

Wireless On-the-Go

Your pocket-sized Valet Connector gives you the power to enjoy wireless on-the-go. Take the Connector with you to connect your laptop to hotspots at coffee shops, hotels, and airports.

Setting Up the Valet Connector

The Cisco Valet Connector helps you connect your computer to a Valet wireless network or any other wireless network for quick Internet access. Installing the Cisco Valet Connector is fairly easy. Just follow the steps below in setting up your Valet Connector on your computer or laptop.


Minimum sysem requirements
- A Computer with 1 GHz or faster processor.
- 512 MB or more RAM.
- An Available USB port.

NOTE: The Valet Connector (AM10) is supported for Windows 7, Vista SP1 and XP SP3 but NOT for Mac.
Step 1:
Connect the Valet Connector to a USB port on your computer or laptop.
 

Alternatively, you can also use the USB Extension Base to connect the Valet Connector. Plug the Valet Connector into the USB Extension Base and connect the Base to a USB port on your computer or laptop.

Step 2:
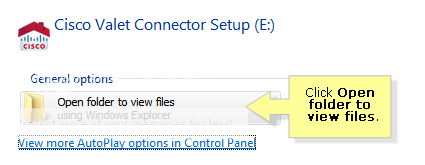
Click Set up your Cisco Valet Connector. Proceed to Step 4.

If you do not see this, click Open folder to view files.


NOTE: For ease of use, the Valet Connector comes preloaded with its installation software. The installation files are stored on the Valet Connector's built in flash storage. However, once Cisco Connect has been successfully installed, this storage facility will no longer be accessible.

Step 3:
Double-click the setup screen as seen in the below image.

NOTE: For Windows XP, the file may be known as Setup.exe. You are not advised to delete any of the files within the AM10. The adapter is not recommended to be used as a USB flash drive.

Step 4:
Read the License Agreement and click Next.

Step 5:

The following screen appears. Wait a few moments while the setup software is setting up your Valet Connector.


Step 6:
If you have an Easy Setup key, select Yes, I have an Easy Setup Key and click Next. Proceed to Step 9.

Otherwise, select No, I don't have an Easy Setup Key and click Next. Proceed to Step 7.


Step 7:
Select your wireless network and click Next.


Step 8:
If prompted, enter the wireless password for your network. Proceed to Step 10.


Step 9:
Follow the on-screen instructions. Click Next once you have completed the on-screen instructions.


Step 10:
The installation is complete when you see the following screen. Click OK.


Step 11:
You are directed to the Cisco Connect screen. Click Close to exit.

Getting to know the Valet Connector (AM10)

The Valet Connector (AM10) connects your Windows-based desktop computer or laptop to your wireless network for Internet access. The main benefit of this device is that it's Plug and Play, which means the computer you connect the AM10 to, would install the drivers needed automatically!

An important feature of this device is the Wi-Fi Protected Access2 (WPA2) encryption for security, which serves to protect your data and privacy.


The AM10 also comes equipped with a USB Extension Base. Using the Base may often improve wireless signal strength, especially with desktop computers that may be located under desks or tabletops.


Product Features:
  • Wireless Standards: 802.11n, 802.11g, 802.11b
  • No. of Antennas: 2 Internal Antennas
  • Security Features: WPA, WPA2
  • Supported Operating System: Windows 7, Vista SP1 and XP SP3


Ayboll