After upgrading the firmware to 1.00.12 WPA is not working properly on some devices.
Solution : Downgrade the firmware to 1.00.10
Showing posts with label routers. Show all posts
Showing posts with label routers. Show all posts
psyb0t worm on Linksys
More information has surfaced about the botnet “psyb0t,” the first known to be capable of directly infecting home routers and cable/DSL modems.
It was first observed infecting a Netcomm NB5 modem/router in Australia.
The Word is spreading of Psyb0t that is going around and compromising the home routers with the default login for the device. According to published numbers around 80,000-100,000 Linksys and Netgear routers have been affected by Psyb0t. It is important note there are a couple of criteria that must be met before your router can be exploited via Psyb0t. First, the router must be a MIPS device (x86 devices are not vulnerable to Psyb0t). Second, it has to be configured to be administered remotely (from the internet, not the local LAN), and third it needs to be using the default password that the device was originally configured with (a common insecure practice).
Although Psyb0t is the first botnet alleged to be exploiting home routers, the concept of compromising routers with default passwords is not a new one.
At their core, these home routers are mini computers, susceptible to attack and infection if proper precautions are not made to protect them. Default passwords for just about every router made are trivial to find on the internet. In fact, there are sites setup, like routerpasswords.com, that allow you to select the manufacturer of the router and it will tell you the default password based on their known models. Be sure to secure all layers of your home or business (plenty of SOHO businesses use standard Cable/DSL modems for their internet connectivity) network. Never assume that this is being done by someone else or that it is someone else's responsibility. The default settings on most of the gear that you will buy are setup such that initial access and administration of the device is easy (reduces support costs and angry customers). From there it is up to you to make sure best practices are followed to keep your network and data secure from outside intrusion.
It was first observed infecting a Netcomm NB5 modem/router in Australia.
The Word is spreading of Psyb0t that is going around and compromising the home routers with the default login for the device. According to published numbers around 80,000-100,000 Linksys and Netgear routers have been affected by Psyb0t. It is important note there are a couple of criteria that must be met before your router can be exploited via Psyb0t. First, the router must be a MIPS device (x86 devices are not vulnerable to Psyb0t). Second, it has to be
 configured to be administered remotely (from the internet, not the local LAN), and third it needs to be using the default password that the device was originally configured with (a common insecure practice).
Although Psyb0t is the first botnet alleged to be exploiting home routers, the concept of compromising routers with default passwords is not a new one.
At their core, these home routers are mini computers, susceptible to attack and infection if proper precautions are not made to protect them. Default passwords for just about every router made are trivial to find on the internet. In fact, there are sites setup, like routerpasswords.com, that allow you to select the manufacturer of the router and it will tell you the default password based on their known models. Be sure to secure all layers of your home or business (plenty of SOHO businesses use standard Cable/DSL modems for their internet connectivity) network. Never assume that this is being done by someone else or that it is someone else's responsibility. The default settings on most of the gear that you will buy are setup such that initial access and administration of the device is easy (reduces support costs and angry customers). From there it is up to you to make sure best practices are followed to keep your network and data secure from outside intrusion.
Astek modem and Linksys router.
Problem : If unable to go online from the computers connected to the linksys router whi9ch is connected to the Astek modem.
Solution : The IP Address of Astek modem is 192.168.1.1 which is similar to the Linksys routers. Change the IP Address on the Linksys router to 192.168.2.1 and keep the DHCP Enabled.
Tuen OFF all the devices including computers, than turn ON the Astek modem than the router and than the computers. You should be online !!
this applies to almost all linksys routers that start with WRT. For example WRT54G, WRT54GS, WRT300N, WRT600N, WRT160N, WRT54GX etc. etc.
Solution : The IP Address of Astek modem is 192.168.1.1 which is similar to the Linksys routers. Change the IP Address on the Linksys router to 192.168.2.1 and keep the DHCP Enabled.
Tuen OFF all the devices including computers, than turn ON the Astek modem than the router and than the computers. You should be online !!
this applies to almost all linksys routers that start with WRT. For example WRT54G, WRT54GS, WRT300N, WRT600N, WRT160N, WRT54GX etc. etc.
How to check the wireless settings on the Linksys Router ?
How to check the wireless settings on the Linksys Router ?
The wireless settings that you need to note on a router are :
- SSID [ Name of the Wireless Network.
- Wireless Channel &
- Wireless Security.
Step 1 : Open the Setup page of the router.
Step 2 : Click on Wireless [Second tab on the Tab].

Step 3 : Look for Wireless Network Name SSID. If the SSID is Linksys, you can change the name to something else. Also note if the SSID Broadcast is set to Enable or Disable.

Step 4 : Click Wireless Security and note the current Security Settings.

If the Security Mode is set to WEP :
In this Example we are using WEP 64 bits.

If the Security Mode is WPA :
In this example, we are using WPA-TKIP.

Step 5 : Click Save Settings.

Hotmail Issue.
Upgraded Hotmail. Cannot type anything in the subject line.
This is a common issue these days with some Linksys Devices like AG241, BEFSR41, BEFW11S4, Wireless routers and Gateways.
Upgrading to Firefox has resolved the issue in many cases.
This is a common issue these days with some Linksys Devices like AG241, BEFSR41, BEFW11S4, Wireless routers and Gateways.
Upgrading to Firefox has resolved the issue in many cases.
LELA
Linksys Easy Link Advisor
 Linksys Easy Link Advisor (LELA) is an application distributed by Linksys that provides an easy way to setup, manage, view, add and repair the network. Its like having a Linksys geek in your home helping you to get the most out of your home network. LELA comes with all the new routers from Linksys. Linksys EasyLink Advisor automatically sets up your home network. LELA can locate every computer, router, storage unit, camera, print server and other device connected to your network. If you already have a wireles router / modem, LELA can help you to optimise the performance of the network by simplyfing the addition of devices and providing an overview of all the devices those are installed. LELA works in the background, watching your network. It will alert you of new devices, poblems, security vulnerabilities and the updates. LELA 3.0 can be used with any routers that have firmware consist of HNAP.
Look at the following pics and you'll see how easy it is to install and use LELA.
 You can select any device from the list as shown in the picture and view its details like the IP Address or MAC Address and even configure the wireless settings like Changing the SSID and Enabling/Disabling the wireless encryption. You can also change the router's password here. Now you nomore need to open the setup page to change the router's password or to configre the wireless settings. It also displays the number of computers and other network devices and their names along with an appropriate icon. You can refresh the page anytime. The refresh button is on the top right hand side. You can kick out any device at any time.
 Follow the Welcome Screen to add a computer or any networking device to the network. If you exit the welcome screen, you can add/remove the computers or devices anytime from the LELA application. To connect any device wireless to the network, you need to know the name of the network (SSID) and the encryption (wireless security). You can view the name of the network from the wireless devices and connect. You can change the wireless encryption anytime, but changing the wireless security setting on the router will affect all the wireless devices connected to the router / modem. You'll need to configure the wireless settings on all the computers/devices connected to the router.
 While LELA was originally designed for Linksys' N routers, it will still work with most of Linksys' G routers. Linksys recommends that you install Windows XP or Vista (x64 and x86) Operating System on your computer. A minimum of 512 MB RAM is required (1 GB is recommended). The network map shows your network devices, the name of your wireless network (SSID), network status, menu options, alerts (if any), and updates (if any). You can manually check for the updates (From network map/list, click on the Updates button, and then select Check for Updates). It also shows you if any unauthorised device is trying to access your network as shown in the picture. You can stop the Internet access to that device anytime. You can even Print the Network Settings. To change the language, On the network map/list, click on File > Preferences > Language. At the initial launch of LELA 3.0, only the WRT160N and the WRT310N firmware will contain HNAP.
Wireless Security
Important tips to secure the Wireless Network on the Linksys Router.
Change the default password of the Router / Access Point :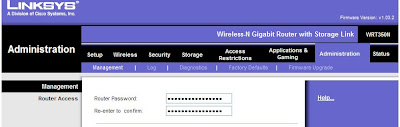
Setup Mac Address Filtering :
Change the default password of the Router / Access Point :
In the setup page click on Administration tab and change the password there, click Save Settings.


Enable Wireless Encryption :
In the Setup page, click Wireless and than click Wireless Security (subtab).
Setup Mac Address Filtering :
Every wireless device has a unique mac address or a physical address. The routers maintains a table that keep track of the mac addresses of all the devices connecting to them. To setup the mac address filtering, on the setup page, click Wireless tab, click Wireless Access (sub tab). By enabling this feature, you can permit / prevent only certain computers' access to the router.
Assign Static IP Addresses to the computers :
By assigning static IP Address to the computer, you wont have to rely on the router's DHCP server. Also you can change the Local IP Address on the router. Remember the IP Addresses that is being assigned to the computers is in the network range of the Local IP Address of the router. After doing this, disable the DHCP on the router. All these settings can be done from the Setup page of the router.
Disable the SSID Broadcast :
If you disable the SSID broadcast the name of the network will no longer be displayed (broadcasted). A wireless profile needs to be created on the computer. Also try not connecting to any free hotspots, as it exposes the computer to security risks. Change the security encryption at regular intervals (eg. after every 2 months)
WRT600N
WRT600N : A 4 in 1 device.
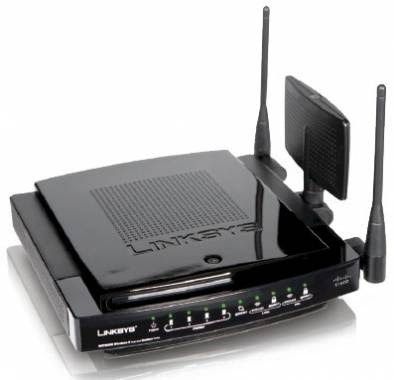 Internet-sharing Router and 4-port Gigabit Switch, with a built-in, dual-band, speed and range enhanced Wireless Access Point
Two simultaneous, separate, radio bands double your available bandwidth
MIMO technology uses multiple radios per band to create robust signals for maximum range and speed, with reduced dead spots
Connect a hard drive or flash-based USB storage device to allow access to your music, video, or data files from within your network, or through the Internet
Advanced wireless security and SPI firewall for protection from Internet attacks
 Internet-sharing Router and 4-port Gigabit Switch, with a built-in, dual-band, speed and range enhanced Wireless Access Point
Two simultaneous, separate, radio bands double your available bandwidth
MIMO technology uses multiple radios per band to create robust signals for maximum range and speed, with reduced dead spots
Connect a hard drive or flash-based USB storage device to allow access to your music, video, or data files from within your network, or through the Internet
Advanced wireless security and SPI firewall for protection from Internet attacks
The Dual-Band Wireless-N Gigabit Router is really four devices in one box. First, there's the dual-band Wireless Access Point, which lets you connect to the network without wires. There's also a built-in 4-port full-duplex 10/100/1000 Switch to connect your wired-Ethernet devices together at up to gigabit speeds. The Router function ties it all together and lets your whole network share a high-speed cable or DSL Internet connection.
It also includes a Storage Link that lets you easily add gigabytes of storage space onto your network using readily available USB 2.0 hard drives -- or plug in a USB flash disk for a convenient way to access your portable data files. The built-in Media Server streams music, video, and photos from the attached storage device to any UPnP compatible media adapter. And you can get to your files from anywhere in the world through the Internet.
The Access Point built into the Router uses a dual-band version of the very latest wireless networking technology, Wireless-N (draft 802.11n). By overlaying the signals of multiple radios for each band, Wireless-N's "Multiple In, Multiple Out" (MIMO) technology multiplies the effective data rate. Unlike ordinary wireless networking technologies that are confused by signal reflections, MIMO actually uses these reflections to increase the range and reduce "dead spots" in the wireless coverage area. The robust signals travel farther, maintaining wireless connections much farther than standard Wireless-G.
With Wireless-N, the farther away you are, the more speed advantage you get. It works great with standard Wireless-G, -A, and -B equipment, but when both ends of the wireless link are Wireless-N, the router can increase the throughput even more by using twice as much radio band, yielding speeds much faster than standard Wireless-G. But unlike other speed-enhanced technologies, Wireless-N can dynamically enable this double-speed mode for Wireless-N devices, while still connecting to other wireless devices at their respective fastest speeds. In congested areas, the "good neighbor" mode ensures that the Router checks for other wireless devices in the area before gobbling up the radio band.
Since the Router can operate in both the 2.4 and 5 gigahertz radio bands at the same time, it effectively doubles your available wireless bandwidth. For instance, you could set up your network to handle video streaming on one radio band, and use the other band for simultaneous data transfers -- avoiding any interference or collisions that would degrade the video performance.
To help protect your data and privacy, the Router can encode all wireless transmissions with industrial-strength 256-bit encryption. It can serve as your network's DHCP Server, has a powerful SPI firewall to protect your PCs against intruders and most known Internet attacks, and supports VPN pass-through. Configuration is a snap with the web browser-based configuration utility.
The incredible speed of Wireless-N and gigabit wired networking is ideal for media-centric applications like streaming video, gaming, and Voice over IP telephony, and gives you plenty of headroom to run multiple media-intense data streams through the network at the same time, with no degradation in performance. With the Linksys Wireless-N Storage Link Router at the center of your home or office network, you can easily add storage, share a high-speed Internet connection, files, printers and multi-player games, and run media-intensive applications at amazing speeds, without the hassle of stringing wires!
It also includes a Storage Link that lets you easily add gigabytes of storage space onto your network using readily available USB 2.0 hard drives -- or plug in a USB flash disk for a convenient way to access your portable data files. The built-in Media Server streams music, video, and photos from the attached storage device to any UPnP compatible media adapter. And you can get to your files from anywhere in the world through the Internet.
The Access Point built into the Router uses a dual-band version of the very latest wireless networking technology, Wireless-N (draft 802.11n). By overlaying the signals of multiple radios for each band, Wireless-N's "Multiple In, Multiple Out" (MIMO) technology multiplies the effective data rate. Unlike ordinary wireless networking technologies that are confused by signal reflections, MIMO actually uses these reflections to increase the range and reduce "dead spots" in the wireless coverage area. The robust signals travel farther, maintaining wireless connections much farther than standard Wireless-G.

With Wireless-N, the farther away you are, the more speed advantage you get. It works great with standard Wireless-G, -A, and -B equipment, but when both ends of the wireless link are Wireless-N, the router can increase the throughput even more by using twice as much radio band, yielding speeds much faster than standard Wireless-G. But unlike other speed-enhanced technologies, Wireless-N can dynamically enable this double-speed mode for Wireless-N devices, while still connecting to other wireless devices at their respective fastest speeds. In congested areas, the "good neighbor" mode ensures that the Router checks for other wireless devices in the area before gobbling up the radio band.
Since the Router can operate in both the 2.4 and 5 gigahertz radio bands at the same time, it effectively doubles your available wireless bandwidth. For instance, you could set up your network to handle video streaming on one radio band, and use the other band for simultaneous data transfers -- avoiding any interference or collisions that would degrade the video performance.
To help protect your data and privacy, the Router can encode all wireless transmissions with industrial-strength 256-bit encryption. It can serve as your network's DHCP Server, has a powerful SPI firewall to protect your PCs against intruders and most known Internet attacks, and supports VPN pass-through. Configuration is a snap with the web browser-based configuration utility.
The incredible speed of Wireless-N and gigabit wired networking is ideal for media-centric applications like streaming video, gaming, and Voice over IP telephony, and gives you plenty of headroom to run multiple media-intense data streams through the network at the same time, with no degradation in performance. With the Linksys Wireless-N Storage Link Router at the center of your home or office network, you can easily add storage, share a high-speed Internet connection, files, printers and multi-player games, and run media-intensive applications at amazing speeds, without the hassle of stringing wires!
WRT150N with DU in U.A.E.

How to configure WRT150N in U.A.E with the ISP DU.
- Connect a computer to WRT150N to any of the 4 ports.
- Most of the times DU doesnt provide a modem cause its not required.
- There is a Ethernet [Cat5] cable that should be connected straight to WRT150N.
- Reset WRT150N for 20 seconds. The reset button is at the rear side of the router.
- Turn OFF the WRT150N. Power it ON after 5 seconds.
- Try Internet from the Computer connected to the router.
- You should be able to go online. You can change the name of the Wireless Network.
- Click on Wiereless Tab and configure the wireless settings there.
- This process applies to all Linksys routers like WRT54G, WRT54GR, WRT54GC, WRT54GL, WRT54GS, WRT100, WRT150N, WRT160N, WRT300N, WRT310N, WRT330N, WRT350N, WRT600N, WRT610N etc.
Wireless Range !
Tips to improve the Wireless Range.
How Can the Range of a WiFi Network Be Boosted? The wireless signal strength depends on many variables. Like the position of the Router / Access Point, interfering devices, thickness of the walls, the adapter/receiver on the computers. We will discuss some factors that will help boost the wireless range and performance.
 The router should not be placed in an isolated part of the house. The router should not be placed near a Television set or any other electronic devise. Avoid placing the router in a cupboard or behind any thing. If the wireless router is against an outside wall of the house , the signal will be weak on the other side of your home. Common sources of interference in residences include brick or plaster walls, microwave ovens, and cordless phones. But there are many other ways to boost the signal of the wireless network. Try keeping the Access Point / Router elevated from the floor and away from any electronic device. Open the Setup page of the Router [the default IP Address is 192.168.1.1] and change the Wireless Channel. Try different combinations to best optimse the
  coverage. For N-Series devices, keep the Radio Band to 40 MHz Channel, Wide Channel to 9 and Standard Channel to 11-2.462 GHz. If you are using a N-Series Access point / Router, also use a N-Series adaptgers to enjoy the N-Series Connectivity. If you place the router is a central position of the house, the wireless range will be covered in the entire house [ofcourse depends on the size of the house] all the devices will be able to connect wireless without any hassel. The N-Series provides a maximum speed of 270MBPS. You can also replace the wireless antennas on the router to boost the range. Like high gain antennas. Or adjust the position of the antenna on the router or the computers to get better reception. Try using a Range Expander to extend the wireless signal. Keep the firmware on the router and the drivers on the adapter updated.
WRT160N
WRT160N : Ultra RangePlus Wireless-N Broadband Router

- Internet-sharing Router and 4-port Switch, with a built in speed and range enhanced Wireless Access Point
- MIMO technology uses multiple radios to create a robust signal that travels farther and reduces dead spots
- Much faster than Wireless-G, but also works great with Wireless-G and -B devices
- Wireless signals protected by wireless encryption, and your network protected from Internet attacks by a powerful SPI firewall
How to connect WRT160N with Virginmedia in UK.
- Connect the computer to any 1 of the 4 ports on the router.
- Reset the router for 10 seconds. The reset button is located at theback side of the router.
- The Powerlight on the router starts flashing. Turn the router OFF & turn the modem OFF.
- Turn the Modem ON first. Wait for 10 seconds. Turn the router ON.
- Try Internet from the computer connected to the router.
- You should be able to go online. If you are not abble to go online, Check the following :
- The computer is not assigned a Static IP Address. If it is, change the setting to Obtain IP Address Automatically.
- Also check the DNS is assigned to Obtain Automatically.
- The connection is done properly.
- To open the Setup page, the default IP Address is : 192.168.1.1
- The default password is admin.
- This process applies to all Linksys routers like WRT54G, WRT54GR, WRT54GC, WRT54GL, WRT54GS, WRT100, WRT150N, WRT160N, WRT300N, WRT310N, WRT330N, WRT350N, WRT600N, WRT610N etc
How to upgrade the firmware on Linksys routers.
How to upgrade the firmware on Linksys routers.
Following are the steps to upgrade the Firmware on Linksys routers.
This process applies to almost all Linksys Products.
Disconnect all wireless clients from the router during the upgrade process. Make sure no wireless clients attempt to associate with the router until the upgrade process is complete.
Step 1 :
Download the firmware from the Linksys Website and save it on the desktop in a new folder called Linksys. The file might be zipped. So unzip the files first.


Step 2 :
Open the setup page of the router. To open the setup page, open Internet Explorer from a computer connected to the router. In the Address Bar type 192.168.1.1. The default password is admin.

Step 3 :
After upgrading the firmware, reset the router for 30 seconds. To reset the router, locate the reset button on the router and press it with a pointed object when the router is ON.
Step 4 :
After resetting the router, turn OFF the Router and the Modem. Keep them OFF for sometime and then turn the Modem On first, wait until all the lights are solid, then the router.
Step 5 :
And its Done !!!
Hakunamatata !

WRT54GR and WRE54G v3.
How to connect the WRE54G to WRT54GR.
WRE54G uses Wireless Distribution System to communicate with the wireless devices.
WRE54G uses Wireless Distribution System to communicate with the wireless devices.
- Make sure the firmwares on both the devices are latest.
- Connect a computer to the WRT54GR.
- Connect the WRE54G to WRT54GR.
- On the computer Open Internet Explorer [or any browser].
- In the address bar type : 192.168.1.1 [default IP Address] a popup should appear.
- Make sure the Popup blocker is Disabled.
- The default password is admin.
- Once in the Setup page click on Wireless [Second TAB on the top].
- In this TAB you can configure the wireless settings for tyhe router like the MODE, Name of the network [SSID] and the CHANNEL.
- Whatever settings you do here you need to copy the same on the Range Expander.
- Minimise the WRT54GR Setup Page. Open a new Internet Explorer.
- In the Address Bar type : 192.168.1.240 [Default IP Address of WRE54G].
The default password is admin. - Once in the Setup page configure the wireless settings same as that of the WRT54GR.
- Also if the wireless network is encrypted, do the relevant settings on the Range Expander.
- Save Settings. Turn OFF the WRT54GR and WRE54G.
- Place the WRE54G where the signal is weak.
- Turn the WRT54GR ON wait for 10 seconds.
- Turn the WRE54G ON. Check the lights.
- The ACTIVITY led lights up whenever there is a successful wireless connection and will flash whenever there is wireless network activity.
- The LINK led lights up when the Range Expander is powered ON. This light will appear blue when the Range Expander is connected to a functioning Access Point or wireless router. It will light up RED when there is NO Access Point or Wireless router to connected to or the settings on the RE does not match with the router.
BEFSR41.
BEFSR41 : EtherFast® Cable/DSL Router with 4-Port SwitchShare Your High-Speed Internet Connection Throughout Your Home or Office
 Connects to a Broadband modem or to an Ethernet backbone;
Equipped with a 4-port 10/100 switch;
Connects all of your PCs to the Internet with only one purchased IP address;
Creates a firewall to protect your PCs from outside intruders;
Configurable through your networked PCs Web browser;
Supports Internet Protocol Security (IPSec) Passthrough;
Remotely administered through your Internet connection;
 The switch dramatically speeds up your gaming and multimedia connections;
Can simultaneously act as both Dynamic Host Configuration Protocol (DHCP) server on the LAN and DHCP client on the WAN;
Compatible with virtually all standard Internet applications;
Administrators can block specific interior user’s Internet access; and
Demilitarized Zone (DMZ) host option provides two-way communication between one PC and your Internet services.
 Connects to a Broadband modem or to an Ethernet backbone;
Equipped with a 4-port 10/100 switch;
Connects all of your PCs to the Internet with only one purchased IP address;
Creates a firewall to protect your PCs from outside intruders;
Configurable through your networked PCs Web browser;
Supports Internet Protocol Security (IPSec) Passthrough;
Remotely administered through your Internet connection;
 The switch dramatically speeds up your gaming and multimedia connections;
Can simultaneously act as both Dynamic Host Configuration Protocol (DHCP) server on the LAN and DHCP client on the WAN;
Compatible with virtually all standard Internet applications;
Administrators can block specific interior user’s Internet access; and
Demilitarized Zone (DMZ) host option provides two-way communication between one PC and your Internet services.
Just connect your DSL or Cable Modem to the Router, and all the computers in your household can share the Internet -- all at the same time. The built-in 4-port switch lets you attach four local PCs directly, or daisy-chain out to more hubs and switches as your network grows. Once your computers are connected to the Internet through the Router, they can communicate with each other too, sharing  resources and files. All your computers can print on a shared printer connected anywhere in the house. And you can share all kinds of files between computers -- music, digital pictures, and other documents. Keep all your digital music on one computer, and listen to it anywhere in the house. Organize all of your family's digital pictures in one place, to simplify finding the ones you want, and ease backup to CD-R. Play head-to-head computer games within the household, or against Internet opponents. Utilize extra free space on one computer when another's hard drive starts to fill up. You can ure the router in 2 ways : Either from the Setup CD provided in the box or thru the Web based Interface. The default IP Address is 192.168.1.1 and the password is admin.
 resources and files. All your computers can print on a shared printer connected anywhere in the house. And you can share all kinds of files between computers -- music, digital pictures, and other documents. Keep all your digital music on one computer, and listen to it anywhere in the house. Organize all of your family's digital pictures in one place, to simplify finding the ones you want, and ease backup to CD-R. Play head-to-head computer games within the household, or against Internet opponents. Utilize extra free space on one computer when another's hard drive starts to fill up. You can ure the router in 2 ways : Either from the Setup CD provided in the box or thru the Web based Interface. The default IP Address is 192.168.1.1 and the password is admin.
WRT54GL with Digiweb !
WRT54GL : Wireless-G Broadband Router.
 All-in-one Internet-sharing Router, 4-port Switch, and 54Mbps Wireless-G (802.11g) Access Point
 All-in-one Internet-sharing Router, 4-port Switch, and 54Mbps Wireless-G (802.11g) Access Point
- Shares a single Internet connection and other resources with Ethernet wired and Wireless-G and -B devices
- Push button setup feature makes wireless configuration secure and simple
- High security: TKIP and AES encryption, wireless MAC address filtering, powerful SPI firewall
How to connect 54GLwith Digiweb in Ireland.
- Connect the computer to any 1 of the 4 ports on the router.
- Reset the router for 10 seconds. The reset button is located at theback side of the router.
- The Powerlight on the router starts flashing. Turn the router OFF & turn the modem OFF.
- Turn the Modem ON first. Wait for 10 seconds. Turn the router ON.
- Try Internet from the computer connected to the router.
- You should be able to go online. If you are not abble to go online, Check the following :
- The computer is not assigned a Static IP Address. If it is, change the setting to Obtain IP Address Automatically.
- Also check the DNS is assigned to Obtain Automatically.
- The connection is done properly.
- To open the Setup page, the default IP Address is : 192.168.1.1
- The default password is admin.
- This process applies to all Linksys routers like WRT54G, WRT54GR, WRT54GC, WRT54GL, WRT54GS, WRT100, WRT150N, WRT160N, WRT300N, WRT310N, WRT330N, WRT350N, WRT600N, WRT610N etc
Setup WPA on Linksys Router !
How can I set up WPA on my Linksys Router?
Step 3 : Select WPA Personal under the Security Mode drop-down menu.
Step 5 : Enter your desired WPA Key on the WPA Shared Key field such as “MyPrivateKey.” This will serve as your network key whenever you connect to your wireless network.

Step 1 : Access the router’s Setup page.
Step 2 : When the router’s web-based, setup page appears, click Wireless and select Wireless Security.
Step 3 : Select WPA Personal under the Security Mode drop-down menu.

Step 4 : Select TKIP on WPA Algorithms.
Step 5 : Enter your desired WPA Key on the WPA Shared Key field such as “MyPrivateKey.” This will serve as your network key whenever you connect to your wireless network.

NOTE : Do not share this key. This key will secure your wireless network. Leave Group Key Renewal to 3600 seconds.
Step 6 : Click Save Settings.
File and Printer Sharing in Windows 98/ME !
Enabling File and Printer Sharing in Windows 98/ME !
Step 1 : Click Start, Settings, then Control Panel.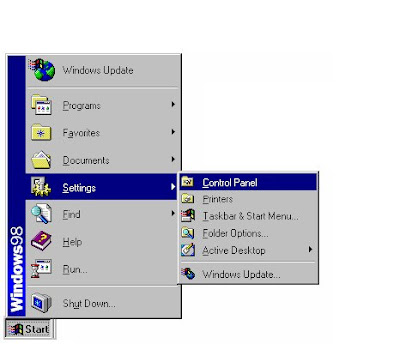
Step 2 : Double-click Network and check the following under the Configuration tab:
Step 1 : Click Start, Settings, then Control Panel.

Step 2 : Double-click Network and check the following under the Configuration tab:
- Client for Microsoft Networks
- IPX/SPX Compatible Protocol > Network Card
- NetBEUI > Network Card
- TCP/IP > Network Card
- File and Printer Sharing for Microsoft Networks
NOTE: If you don't have IPx/SPx, and/or NetBEUI you'll have to click add, protocols, then Microsoft and select which ever protocol you need.
Step 3 : Under Primary Network Log On, set it to Client for Microsoft Networks.
Step 4 : Click File and Printer Sharing and make sure both boxes are checked.
Step 5 : Click the Identification tab and make sure the Workgroup name is identical on all computers on the network. Computer name has to be unique on each computer.
Step 6 : Under Access Control, make sure Share Level Access Control is checked.
Step 7 : Click OK then restart the computer.
Enabling File Sharing
Step 1 : Double-click My Computer.
Step 2 : Right-click the drive then right-click the folder you want to make available to other users.
Step 3 : Click Sharing then the Sharing tab.
Step 4 : Click Share As then enter your drive or folder name in the Share Name field. The name on Share Name may vary depending on your preference.
Step 5 : Decide which type of access you want to give other users. A Read-Only access allows other users to view the files on your PC. Full access allows users to create, change, or delete files on your system. Depends on Password allows users have Read-Only and/or Full access, depending on the password that you decide to share with them.
Step 6 : Use your mouse to select the type of file sharing access you want other users to have. If you want to assign access password(s), type them into the Password fields. When you're done, click Apply then OK. Your drive(s) can now be accessed from other users whenever they click their Windows 95 Network Neighborhood icons. If a user tries to access one of your drives that is password-protected, he/she will be asked for the appropriate Read-Only or Full access password. After the item is shared, you will see a hand appear underneath the folder or hard disk.
Sharing Printers
Step 1 : Double-click My Computer then click the Printers folder.
Step 2 : Right-click the printer you want to share with the other users.
Step 3 : Click Sharing then the Sharing tab.
Step 4 : Click Share As. Look for the Share Name field, give a name to the printer you're about to share. If you want to assign a password to the printer so only certain users can access it, enter it in the Password field.
Step 5 : Click Apply then OK. Your printer(s) are now shared.
NOTE: If you're using Windows 98/ME and want to access a Windows 2000/XP PC, you may not be able to access the shared portions of the Windows 2000/XP computer due to user right restrictions. To get around this, you may want to have the Window 2000/XP PC access the files from the 98/ME machine. Otherwise, you'll need to setup User permissions. Please remember that Linksys does not warrant this information and will not be held responsible for any software corruption as the result of this information. For more information regarding User permissions, check Microsoft’s website or contact their technical support.
File Sharing in Windows 2000 !
File Sharing in Windows 2000.
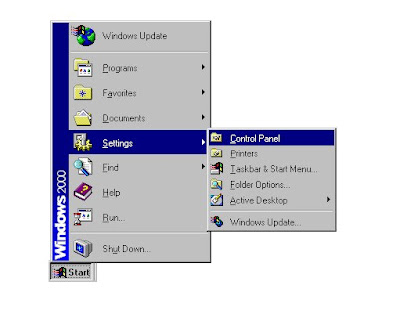
Step : 1 Click Start, Settings, then Control Panel.
Step 3 : Check for the following:
Step : 1 Click Start, Settings, then Control Panel.

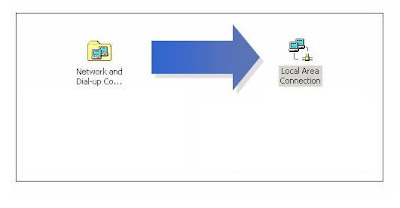
Step 2 : Double-click Network and Dial-up Connections then Local Area Connection.

Step 3 : Check for the following:
- Client for Microsoft Networks
- File and Printer Sharing for Microsoft Networks
- Internet Protocol (TCP/IP)
- NetBEUI
- IPx/SPx
NOTE: If you don't have NetBEUI or IPx /SPx please go to Step 4, otherwise proceed to Step 5.
Step 4 : Click Install and select the protocol that needs to be added:
- NetBEUI
- IPx/SPx Compatible Protocol
Step 5 : Click Close then Close again to go back to Control Panel.
Step 6 : When the Control Panel appears, double-click System.
Step 7 : When System Properties appears, click Network Identification then Properties.
Step 8 : Make sure the computer name you're using is a unique name and workgroup is selected, not domain.
NOTE: Make sure the computer has the same Workgroup as the rest of the network.
File And Printer Sharing
Although linksys devices do support file and printersharing, Linksys do not officially provide voice , email or chat support for the same and if you need to still configure it, do it at your own risk.
For Windows XP :

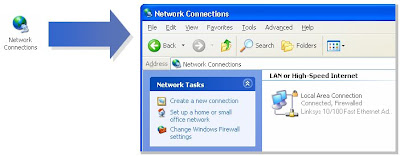
Step 3 : Select Set up a home or small office network to run the networking wizard.
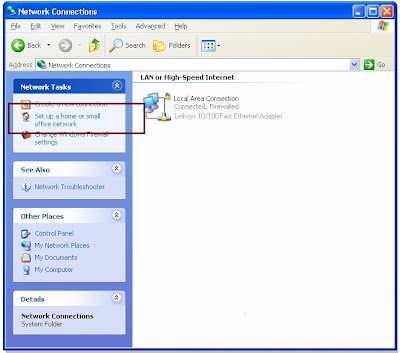
Step 4 : Select This computer connects to the Internet through a residential gateway or through another computer on my network then click Next.
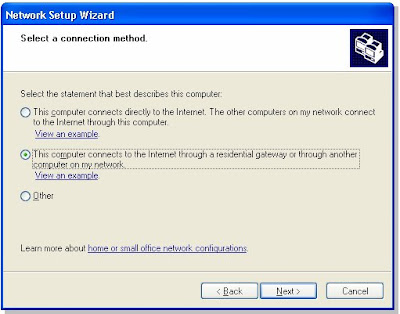
Step 5 : Once the wizard is finished, you'll have to make a floppy disk that you'll run on the other computers on the network to set them up.
Step 6 : Restart the computers. You should now be able to share files.
For Windows XP :
Step 1 : Click Start, then Control Panel.


Step 3 : Select Set up a home or small office network to run the networking wizard.

Step 4 : Select This computer connects to the Internet through a residential gateway or through another computer on my network then click Next.

Step 5 : Once the wizard is finished, you'll have to make a floppy disk that you'll run on the other computers on the network to set them up.
Step 6 : Restart the computers. You should now be able to share files.
Tomato Firmware !
Tomato Firmware for Linksys Routers.
What is Tomato Firmware ?
Tomato is free open source Linux-based firmware for several Broadcom-based Wi-Fi routers. The major emphasis of Tomato is on stability, speed and efficiency. It is maintained by Jonathan Zarate, who also developed HyperWRT +tofu. Click here to go to the official Website.
Tomato is NOT compatible with Linksys WRT54G/GS v5-v7 or newer WRT54G/GS routers. These routers do not run Linux. The Linksys WRT54GL router is best if you are interested in making a Tomato-compatible purchase.
What is Tomato Firmware ?
Tomato is free open source Linux-based firmware for several Broadcom-based Wi-Fi routers. The major emphasis of Tomato is on stability, speed and efficiency. It is maintained by Jonathan Zarate, who also developed HyperWRT +tofu. Click here to go to the official Website.
Tomato is NOT compatible with Linksys WRT54G/GS v5-v7 or newer WRT54G/GS routers. These routers do not run Linux. The Linksys WRT54GL router is best if you are interested in making a Tomato-compatible purchase.
Subscribe to:
Posts (Atom)