NAS200 - Download Manager !

The Download Manager is designed for users to initiate an FTP or HTTP download using a PC’s Web browser. Once the task is initiated, you may turn off the pc and NAS200 will continue the download independently. For instance if you are downloading a movie, you can use the NAS200 and use the computer for any other use or simply turn it off.


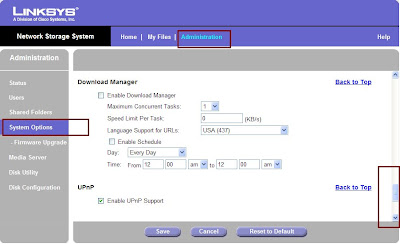
To configure the Download Manager, Open the NAS200 web based User Interface and click on Administration Tab. Than select System Options from the Left Hand Side. Here you can Enable / Disable the Download Manager. If the Download Manager feature has been enabled through the Administration > System Options screen and your login has Download Manager access, then the My Downloads option will also be displayed. On this Page in the Identification settings you can configure the network settings like the name of the device and the Workgroup. In the IP Address settings, you can set the device to either as a DHCP client or assign a Static IP Address. Its always recommeneded to assign a Static IP Address. Than comes the DNS Server settings option. Here too you can select between DHCP and static. Than there is WINS and DDNS that works with TZO. If you dont have an account with TZO, you can signup for one from this Option. Than there is Date & Time where you can enable and configure NTP and also see the status of the same. In E-Mail Alert you can configure upto 3 Emails that will be notified if any problem occurs. You need to specify the SMTP port number. Scheduled Shutdown enables you to schedule a Shutdown [:)]. And you have UPnP.
NAS200

Setting up NAS200.
Network Storage System with 2 Bays.

NAS200 is an ethernet connected network storage with two available SATA hard drive bays that adds shared storage directly to your network. You can add even more storage with two USB 2.0 ports for hard drive or flash USB storage devices and securely share files locally or through the Internet (FTP, HTTP) with no dedicated PC needed. It also includes an advanced backup software and a built-in media server for streaming to PC or UPnP AV digital media adapter.


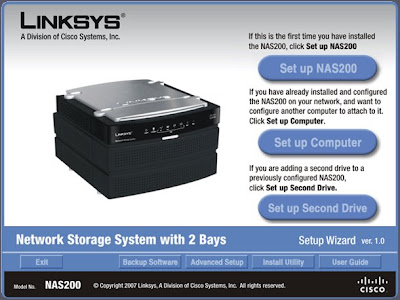
To access the Setup Wizard, iInsert the Setup Wizard CD-ROM into your PC’s CD-ROM drive. The Setup Wizard should run automatically,and the Welcome screen should appear. If it does not, click Start and then Run. In the field provided, enter D:\SetupUtilizty.exe (if “D” is the letter of your CD-ROM drive). Setting up the NAS200 is very quick and simple as compared to other NAS devices. Don't loose the Setup CD cause you'll need it to configure every PC on your network as well as if you decide to swap out your hard disks for new ones or add a second drive. Fortunately, you can download the entire CD from Linksys' Web site and then simply copy it to a data CD should you ever lose the original. Setup NAS200 Install the Network Storage System for the first time. (The instructions are covered in the Quick Installation.) Set up Computer Configure another computer to use the Network Storage System. Setup Second Drive Add a second hard drive to the already configured Network Storage System. Exit Use this option to close the Setup Wizard. Backup Software Install a third-party program to run backup jobs. Advanced Setup Use this option to access the web-based utility. Install Utility Use this option to install the Network Drive Mapping Utility. User Guide Use this option to open the pdf of NAS200.


Step 1 is the Physical Installation. The Setup Wizard automatically searches for any Network Storage System on your network. If it is not detected, check its cable connections, and make sure it is powered on. Click Search Again to locate the Network Storage System. Select the appropriate Network Storage System. Click Next. To install the second hard drive:
Power off the Network Storage System. Push together the clips, and remove the lower drive bay door. Lift up the ribbon. Make sure the connector side of the drive faces the bay, and the label side faces up. Make sure the drive is inserted under the ribbon. Push the drive in until it snugly fits in the bay. Replace the drive bay door. Wait until you hear the Network Storage System
be
ep twice. Then click Next. The NAS200 has an easy array of options for configuring your internal disks. With two disks installed, you can run them as separate volumes, one large volume or have the two play off each other in RAID 0 or RAID 1 configurations. All this is done in a few mouse clicks. But beware, changing a disk or recovering from a disk crash with a new one means rebuilding the NAS200 from the ground up. So be sure to backup the NAS200 occasionally, too. Once your NAS200 goe through basic setup, you can maintain it or enable advanced features from a Web-based administration console. Or you can simply browse the box using a Web browser, which is especially useful if you've enabled the FTP server option


Ayboll