Applies to all the print servers from Linksys by Cisco [WPSM54G, WPS54G, WPS54GU2 etc..]
How do I configure my Linksys PrintServer using the Bi-Admin Management Utility?A Utility program called Bi-Admin manages the PrintServer on the Network. It is compatible with Windows 95, 98, NT, ME, 2000, XP and Novell NetWare. Bi-Admin allows you to change the PrintServer’s internal settings, check on the unit’s status, and perform basic diagnostic tests.
There are five major settings on your PrintServer that you may need to configure to use the BiAdmin Management Utility:
Detecting the PrintServer
Assigning an IP Address on the PrintServer
Changing the PrintServer’s Password
Checking Printer Status
Configuring the PrintServer’s Wireless Settings
To use the Bi-Admin Management Utility, please follow the steps below.
Detecting the PrintServer
NOTE: Make sure the printer drivers are installed on the PC and you have an active network connection. Ensure the Bi-Admin Management Utility is installed on your computer. To install the Bi-Admin Utiliy, explore the contents of the CD, look for the Bi-Admin folder and run the Bi-Admin setup.exe.
Step 1:
Click Start on your toolbar, then All Programs. Select Print Server Utility from the Program menu, then BiAdmin Management Utility.
NOTE: If the Bi-Admin icon has been created, you can double-click it instead.

Step 2:
When the Connected Protocol window appears, make sure the TCP/IP is checked, then click OK.

Step 3:
The Bi-Admin Management Utility will automatically scan the network for available Wireless PrintServer hardware.

NOTE: If the Bi-Admin Management utility cannot detect the PrintServer, you need to :
Check if the printserver is powered on.
Ensure all firewalls on your computer are disabled.
Make sure there is a DHCP server on the network.
Step 4:
After it detects the PrintServer, the Bi-Admin Management Utility will display the PrintServer name and details.

Step 5:
Enter your PrintServer’s password (“admin” is the default password), then click OK.

NOTE: If the PrintServer’s password has been changed, type the PrintServer’s new password instead.
The PrintServer’s password can be changed by:
Running the PrintServer’s setup CD.
Changing it on the PrintServer’s web-based setup page.
If you forgot the PrintServer‘s password, you may reset the PrintServer to default settings.
Step 6:
Select the adapter you are using to connect to the PrintServer from the Adapter Card Lists, then click OK.

Assigning an IP Address on the PrintServer
The Linksys PrintServer uses a dynamic default IP Address. To configure a static IP on your Linksys PrintServer, follow the steps below.
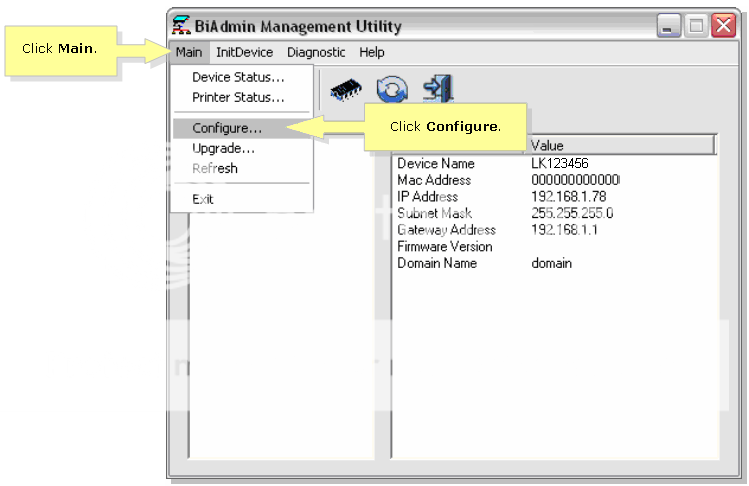
Step 1:
Click Main then select Configure.
Step 2:
Click TCP/IP.

Step 3:
Select Fixed IP Address and enter the IP Address, Subnet Mask, and Gateway Address in the fields provided. In this example the IP address “192.168.1.78”, the Subnet Mask “255.255.255.0 and the Gateway Address “192.168.1.1” were used.

NOTE: Make sure the IP Address you’ll be assigning the PrintServer has the same first 3 numbers as the IP Address and the last number can be any number between 2 and 99. In this example, the IP address of the router is 192.168.1.1. After attaching any number between 2 and 99, the IP address of the PrintServer will be 192.168.1.78.
Changing the PrintServer’s Password
The Linksys PrintSever uses “admin” for a default password. If you want to change it for security reasons, follow the steps below.
Step 1:
Click Main, then select Configure.

Step 2:
When the Configuration window appears, select Change Device Password.
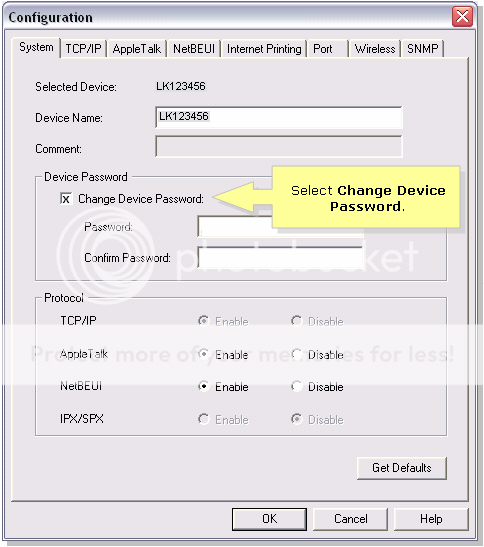
Step 3:
Enter the new password you want and retype the same password to confirm then click OK.

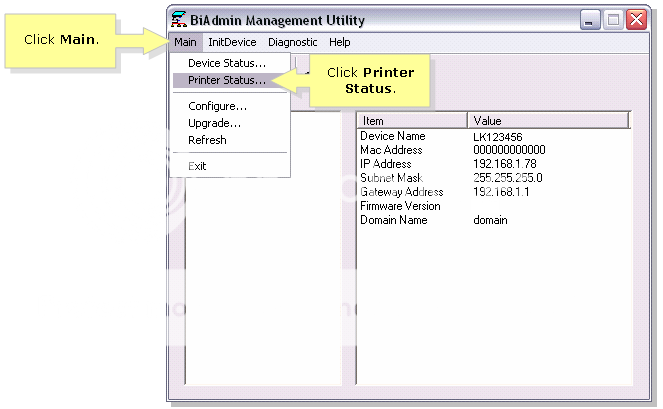
Checking Printer Status
The Printer Status option allows you to check the name, status, and printing details of each printer attached to the PrintServer. A password may be required to access this information. You may be able to configure some printers’ settings in the Printer Configuration window.
Step 1:
Click Main, then select PrinterStatus.
Step 2:
Enter your print server’s password (“admin” is the default password), then click OK.
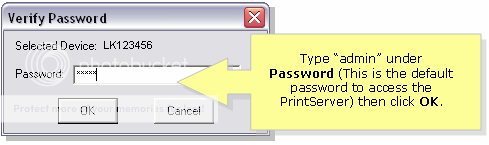
NOTE: If the PrintServer’s password has been changed, type the PrintServer’s new password instead.
The PrintServer’s password can be changed by:
Running the PrintServer’s setup CD.
Changing it on the PrintServer’s web-based setup page.
If you forgot the PrintServer‘s password, you may reset the PrintServer to factory default.
Step 3:
When the Printer Status appears, select the port where the printer is connected to view its status.

Configuring the PrintServer’s Wireless Settings
If you have a wireless router and you want to configure the PrintServer’s wireless settings using the Bi-Admin Management Utility, follow the steps below.
Step 1:
Click Main then select Configure.

Step 2:
Click Wireless.
Step 3:
Enter the same “SSID” or “Wireless Network Name” you configured on the router’s Basic Wireless Settings page. In this example the SSID “linksys” was used. If you cannot remember the SSID on your router, check the Basic Wireless Settings on your router.
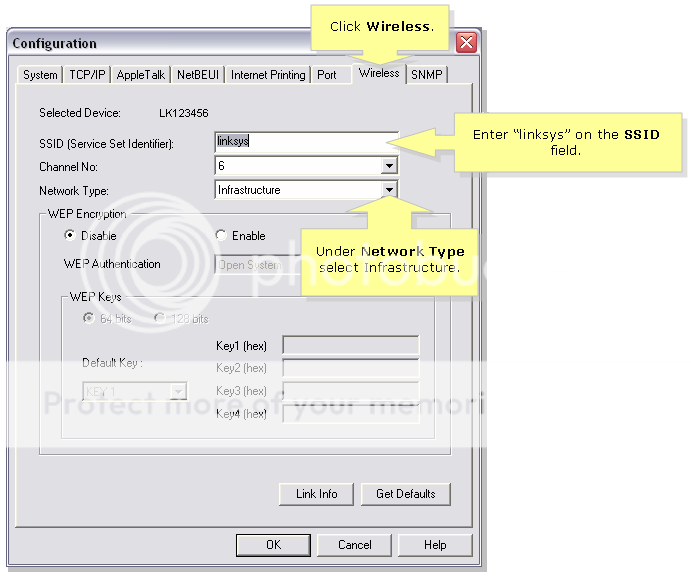
Step 4:
Select the network type. The options are:
Infrastructure if you want the PrintServer to communicate using an access point or wireless router.
Ad-Hoc if you want the PrintServer to communicate without using an access point or wireless router.
NOTE: If you are using the Ad-Hoc mode, you need to select the appropriate channel from the drop-down menu. Make sure you entered your router’s SSID.
Step 5:
Select the same Wireless Security level (“64 bits” or “128 bits”) you configured on the router’s Wireless Security page. For WEP Encryption, select Enable and for WEP Authentication, select Open System. Type the same network key configured on the router, then click OK.

NOTE: If are using WPA on your router, you need to upgrade the firmware of your PrintServer. Click here for instructions on upgrading the firmware on Linksys devices.
Step 6:
After setting up the wireless settings of your PrintServer, perform a power cycle. Refer to the instructions below.
Power Cycling the PrintServer:
Step 1:
Unplug the PrintServer’s power cable.
Step 2:
Disconnect the Network cable from the PrintServer.
Step 3:
Plug in the PrintServer’s power cable to connect the PrintServer wirelessly to the network.