Problem : If unable to go online from the computers connected to the linksys router whi9ch is connected to the Astek modem.
Solution : The IP Address of Astek modem is 192.168.1.1 which is similar to the Linksys routers. Change the IP Address on the Linksys router to 192.168.2.1 and keep the DHCP Enabled.
Tuen OFF all the devices including computers, than turn ON the Astek modem than the router and than the computers. You should be online !!
this applies to almost all linksys routers that start with WRT. For example WRT54G, WRT54GS, WRT300N, WRT600N, WRT160N, WRT54GX etc. etc.
Jersey Telecom settings with Linksys.
The settings for Jersey Telecom with Linksys Modems is same like any ADSL ISP in the UK.
Encapsulation : RFC 2364 PPPoA.
Multiplexing : VC
QoS : UBR
Disable the Autodetect and change the VPI to 0[zero] and VPI to 38.
Put the Username and Password from the Jersey Telecom and select Keep Alive.
Click Save Settings.
The settings mentioned above applies to many Internet Providers in the UK like British Telecom, Talktalk, AOL, Virgin, Tiscali, Wanadoo, Orange etc. However its recommended to verify the settings with the respective service provider beforehand. These settings also applies to almost all modems from Linksys like : WAG54G, WAG54GS, WAG354G, WAG200G, WAG54G2, WAG300N, WAG325N, WAG150N, WAG160N, WAG600N ....... in short it applies to any Linksys Device that starts with WAG.
Microsoft Answers beta website launched
Microsoft has launched a new web site only for Windows Vista users: answers.microsoft.com. Microsoft Answers, currently in beta (the site is often down and under maintenance), is a support forum in the Q&A format. There are three ways of using the service:
Use the search bar at the top of the page to find existing answers to your question.
Browse specific category pages under Find Answers.
Ask the community how they fixed a problem or how they did something.
The idea behind the website is a great one: have an official forum for Windows tech support that is run by actual Microsoft employees willing to help out users. Furthermore, you can subscribe to your question and be notified via your browser, e-mail, or RSS when there is an answer posted. Unfortunately, signing up is mandatory: there is no way to see questions and answers without being signed in.
Cannot connect to WAP4400N from a Macintosh Computer.
Unable to connect from a Macintosh computer to WAP4400N when WPA2 is enabled.
Solution :
Upgrade the firmware on WAP4400N to 1.2.17
Reset the WAP4400N. Reconfigure with appropriate settings.
Should work !!!
Solution :
Upgrade the firmware on WAP4400N to 1.2.17
Reset the WAP4400N. Reconfigure with appropriate settings.
Should work !!!
How to check the wireless settings on the Linksys Router ?
How to check the wireless settings on the Linksys Router ?
The wireless settings that you need to note on a router are :
- SSID [ Name of the Wireless Network.
- Wireless Channel &
- Wireless Security.
Step 1 : Open the Setup page of the router.
Step 2 : Click on Wireless [Second tab on the Tab].

Step 3 : Look for Wireless Network Name SSID. If the SSID is Linksys, you can change the name to something else. Also note if the SSID Broadcast is set to Enable or Disable.

Step 4 : Click Wireless Security and note the current Security Settings.

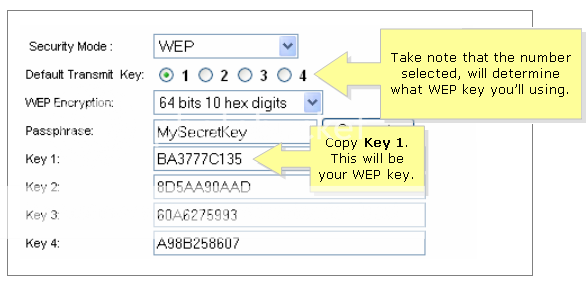
If the Security Mode is set to WEP :
In this Example we are using WEP 64 bits.
If the Security Mode is WPA :
In this example, we are using WPA-TKIP.

Step 5 : Click Save Settings.

How to check the IP Address of DMA
Click here to Access the DMA Page.
How to check the IP Address of Digital Media Extender Using the Router’s DHCP Client Table
Step 1:
Access the router’s web-based setup page.
Step 2:
When the router’s web-based setup page appears, click Status then Local Network.

Step 3:
Click DHCP Client Table to view the devices connected to the router.
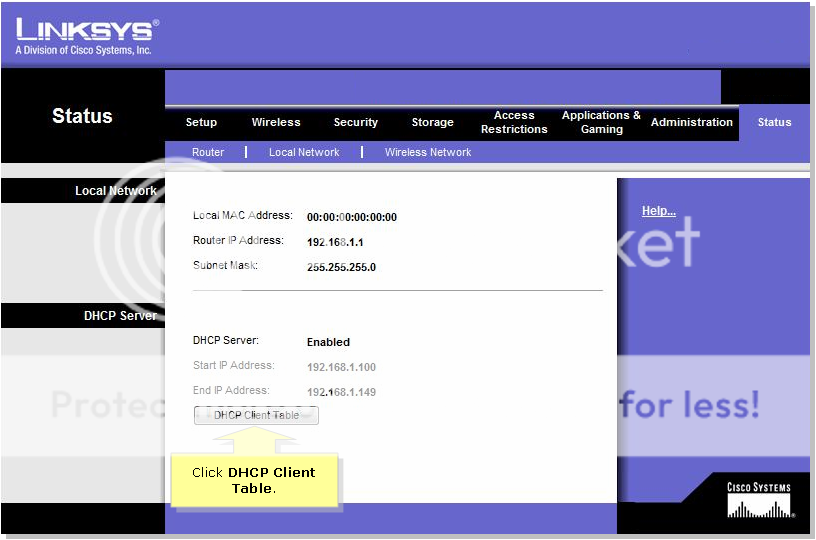
Step 4:
Check if the IP address of the media extender appears on the DHCP Client Table. After checking the IP address of the PC, ping the media extender. For instructions, follow the steps below.

Configuring Motion Detection and Email Alert on WVC200
Configuring Motion Detection and E-mail Alert
Step 1:
Access the Camera’s Web UI by going to http://Camera_IP_address[192.168.1.115]
Step 2:
Click on Setup then click Options.
Step 3:
Select Enable E-Mail Alert and fill-up the following required fields: Send To, Show “From” As, and SMTP Mail Server.
Figure 3.1 Camera Web UI

Figure 3.2 Select Enable Email Alert and make sure to fill-up the following fields: Send To, Show “From” As, and SMTP Mail Server.

Step 4:
Click on Set Area & Sensitivity to set the area of the video image that you would like to capture.

Step 5:
To check if Email Alert is working, go to Status and check the System Log.

NOTE: No recorded videos will be saved on your computer. Motion Detection videos will be automatically sent to the email address specified on E-mail alert but no video files will be saved on your computer.
ISP setting for UTV Internet UK
Following are the Settings for UTV Internet in UK for Linksys routers.
Encapsulation : PPPoE
Multiplexing : LLC
VPI : 8
VCI : 35
Expanding range of WRV200 with WAP200
Can WAP200 be used as a repeater for WRV200?


As mentioned in the datasheet of WRV200 that its compatible with only WAP54G and WAP54GPE, but these products are replaced by WAP200 and WAP200E. With the default configurations, these two devices [WRV200 and WAP200] cannot be configured together, hence it is often misunderstood that there is some compatibility issue.
Here, we will discuss how can WAP200 be configured to Repeat Signal of WRV200.
WRV200 : Hardware v1.0 ; Firmware v1.0.39.
WAP200 : Hardware v1.0 ; Firmware v1.0.22.
- IP Address of WRV200 : 192.168.1.1
- IP Address of WAP200 : 192.168.1.245
Ensure that the AP Isolation is set to DISABLED, Wireless isolation is DISABLED and Wireless Isolation within SSID is also DISABLED. Also ensure that there is no IP Address Conflict in the network.
Step 1 : Open the Setup page of the WRV200. Click on Wireless TAB. In Basic Wireless Settings, change the Wireless Network Mode to G-Only and the Wireless Channel to 6.

Step 2 : Now click Wireless Security[Second Subtab under wireless]. The Security Mode should be Disabled & the Wireless Isolation within SSID be also Disabled.

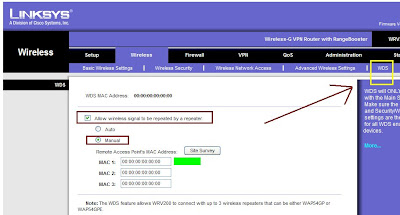
Step 3 : Now click WDS. And click Manualand Enter the MAC Addresses manually.

Step 4 : Now Click on Advanced Wireless Settings and Disable the AP Isolation.
Step 5 : Now open the setup page of WAP200 and set it to Repeater Mode. [ This can be configured from the Wireless TAB on the Setup page]. And Change the Wireless Nework Mode to G-Only and the Channel to 6.
Step 6 : Disable the Wireless Security and the Wireless Isolation(within SSID) to Disabled.
Step 7 : Now Click on Advanced Wireless Settings and Change the BSS Basic Rate to G-Only.
Step 8 : Now click on AP Mode and click on Wireless Repeater.

Now turn OFF WRV200 and WAP200. Turn ON WRV200 first, wait for 10 seconds and than turn the WAP200 ON. Should Work !!!
WAP200 :

______________________________________________
WRV200 :

PLTK300.
Powerline Network Kit.
 Bundle of PLTE200 and PLTS200 Powerline 'Turbo' products. With Powerline Network Adapters, you can connect computers or any other wired Ethernet device using the HomePlug® 1.0 with Turbo network standard. They work with older HomePlug 1.0 devices too. Now adding more devices to the network is as simple as plugging a Powerline Adapter into an electrical outlet, and connecting your Ethernet-equipped devices to the built-in Ethernet ports. Additional devices can be connected to the same network using additional Powerline Adapters plugged into any electrical outlet anywhere in the house. The content of a similar kit is described below.
 Bundle of PLTE200 and PLTS200 Powerline 'Turbo' products. With Powerline Network Adapters, you can connect computers or any other wired Ethernet device using the HomePlug® 1.0 with Turbo network standard. They work with older HomePlug 1.0 devices too. Now adding more devices to the network is as simple as plugging a Powerline Adapter into an electrical outlet, and connecting your Ethernet-equipped devices to the built-in Ethernet ports. Additional devices can be connected to the same network using additional Powerline Adapters plugged into any electrical outlet anywhere in the house. The content of a similar kit is described below.
Ports for XBOX.
Ports for Xbox are 88 and 3074.
U might need to open ports in Internet Connection Firewall to use XBOX.
How to manually open ports in Internet Connection Firewall in Windows XP.
1. Click Start, and then click My Network Places.
2. Under Network Tasks, click View Network Connections. (Or, right-click My Network Places on the desktop, and then click Properties.)
3. Right-click the connection that you use for the Internet, and then click Properties.
4. Click the Advanced tab, and then click Settings.
Note If the Settings button is unavailable, ICF is not enabled on this connection, and you do not have to open any ports (because they are all already open).
5. Click Add to open a new port.
6. In the Description box, type a friendly name. For example, type File Sharing : Port 445.
7. In the Name or IP address of the computer hosting this service on your network box, type 127.0.0.1.
Note You can specify the IP address of an internal computer. But you typically will use 127.0.0.1.
8. In the External port and Internal port boxes, type the port number. Generally, this number is the same.
9. Click either TCP or UDP, and then click OK.
10. Repeat steps 1 through 9 for each port that you want to open.
Linksys renamed to CBG.
Linksys will now be formally known as the Cisco Consumer Business Group (CBG). Cisco had announced earlier this year that the Linksys product brand was transitioning to ‘Linksys by Cisco’ and that for the time being would continue to coexist with Cisco brand products. According to Cisco, CBG will focus on building and maintaining Linksys' retail, online and consumer reseller channels.
WRT54G2 with Wimax.
How to configure WRT54G2 with Wimax in Dubai.
Wimax in U.A.E. needs to be configured with PPPoE settings on the routers.
You will need the username and password from Wimax.
WAG54G2
WAG54G2 : Wireless-G ADSL2+ GatewayThe all-in-one modem and router solution for Internet connectivity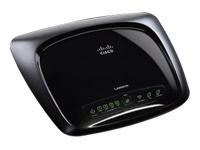

High-speed ADSL2+ Modem gives you a fast, "Always On" connection to the Internet
Connect your PCs via the built-in Router and 4-port Switch to jump start your Ethernet network and share the Internet throughout your household
Built-in Wireless-G (802.11g) Access Point with integrated high-gain antenna also lets you connect without running wires
Advanced firewall and security
Connect your PCs via the built-in Router and 4-port Switch to jump start your Ethernet network and share the Internet throughout your household
Built-in Wireless-G (802.11g) Access Point with integrated high-gain antenna also lets you connect without running wires
Advanced firewall and security
Linksys Appoints New Sales Director for India.
Linksys Appoints New Sales Director for India
Linksys has appointed Suresh Balasubramanian as its new National Sales Director for the Indian market. In his role, Balasubramanian will lead the sales operations throughout India, and will manage strategy for resellers and partners.
Commenting on this appointment, Craig Gledhill, Vice President (Asia Pacific), Linksys, said, "We are committed to providing consumers with a full range of home networking solutions that are built with the consumer in mind. In order to expand our consumer business continuously in India, it is critical that we have the leadership in place to ensure our success in India. Today, I am pleased to announce that Suresh Balasubramanian has joined Linksys. His experience and knowledge in the technology industry will be invaluable in driving our business in the consumer market."
Suresh comes to Linksys with more than 14 years in the technology industry. He spent his past 10 years in various key roles at Microsoft Corporation and most recently served as the Manager, Business Planning and Operations. In this role, he was responsible for managing and growing the small and mid-market customer organization universe in India. He was also responsible for cultivating and growing the ecosystem of channel partners focused on the company's technologies and products.
[AP : Channeltimes]
Linksys WAP4400N Denial of Service and SNMPv3 Issues

Two vulnerabilities have been identified in Linksys WAP4400N, which could be exploited by attackers to cause a denial of service or bypass security restrictions.
The first issue is caused by an error when processing malformed association requests while the access point is in WEP mode, which could be exploited to crash an affected device, creating a denial of service condition.
The second vulnerability is caused by an unspecified issue related to SNMPv3.
For complete information, click here.
Hotmail Issue.
Upgraded Hotmail. Cannot type anything in the subject line.
This is a common issue these days with some Linksys Devices like AG241, BEFSR41, BEFW11S4, Wireless routers and Gateways.
Upgrading to Firefox has resolved the issue in many cases.
This is a common issue these days with some Linksys Devices like AG241, BEFSR41, BEFW11S4, Wireless routers and Gateways.
Upgrading to Firefox has resolved the issue in many cases.
WAG200G with Altec Telecoms.
How to configure Linksys WAG200G with Altec Telecoms in Greece.
Follow the steps below to connect WAG200G with Altec Telecoms.
Follow the steps below to connect WAG200G with Altec Telecoms.
- Encapsulation : RFC 2364 PPPoA
- Multiplexing : LLC
- VPI : 8 VCI : 35
- Username & Password from Altec.
- Select Keep Alive. You should be able to go online !
Latest Frimwares for Linksys Devices.
Latest Firmware updates.
.
.
Product | Ver | Firmware | Link |
WAG54GS | 1 | 1.01.03 | |
WAG200G | 1 | 1.01.06 | |
WAG160N | 1 | 1.00.09 | |
WAG300N | 1 | 1.01.07 | |
WAG325N | 1 | 1.00.12 | |
WAG54G | 1 | 1.02.1 | |
1.2 | 1.02.1 | ||
2 | 1.01.15 | ||
3 | to be released | NA | |
| WAG54GX2 | 1 | 1.00.09 | |
WAG54GP2 | 2 | 2.01.06 | |
WAG354G | 1 | 1.01.11 | |
2 | 1.01.58 | ||
WRT54G | 1 to 4 | 4.21.1 | |
5 & 6 | 1.02.5 | ||
7.0 | 7.00.4 | ||
7.2 | 7.2 | ||
8.0 | 8.00.5 | ||
8.1 | 8.01.08 | ||
8.2 | 8.2.05 | ||
WRT54GS | 1 to 3 | 4.71.4 | |
4 | 1.06.3 | ||
5 & 6 | 1.52.5 | ||
7 | 7.50.5 | ||
7.2 | 7.2.05 | ||
WRT54GC | 1 | 1.05.7 | |
2 | 1.01.0 | ||
WRT54GX | 1 | 1.02.15 | |
2 | 2.00.20 | ||
WRT54GX2 | 1 | 1.01.22 | |
2 | 1.00.08 | ||
WRT54GL | 1 | 4.30.12 | |
WRT54GR | 1 | 1.03 | |
WRT100 | 1 | 1.0.02 | |
WRT150N | 1 | 1.51.3 | |
WRT160N | 1 | 1.02.2 | |
WRT330N | 1 | 1.00.4 | |
WRT300N | 1 | 2.00.13 | |
2 | 2.00.20 | ||
WRT350N | 1 | 1.03.7 | |
2 | 2.00.17 | ||
| WRT600N | 1 | 1.01.36 | |
WRE54G | 1 | 1.06.05 | |
2 | 2.1.12 | ||
3 | 3.04.1 | ||
WAP54G | 1 & 1.1 | 3.04 | tinyurl.com/3yracn |
| 2 & 3 | 3.05.3 | tinyurl.com/yrklox |
LELA
Linksys Easy Link Advisor
 Linksys Easy Link Advisor (LELA) is an application distributed by Linksys that provides an easy way to setup, manage, view, add and repair the network. Its like having a Linksys geek in your home helping you to get the most out of your home network. LELA comes with all the new routers from Linksys. Linksys EasyLink Advisor automatically sets up your home network. LELA can locate every computer, router, storage unit, camera, print server and other device connected to your network. If you already have a wireles router / modem, LELA can help you to optimise the performance of the network by simplyfing the addition of devices and providing an overview of all the devices those are installed. LELA works in the background, watching your network. It will alert you of new devices, poblems, security vulnerabilities and the updates. LELA 3.0 can be used with any routers that have firmware consist of HNAP.
Look at the following pics and you'll see how easy it is to install and use LELA.
 You can select any device from the list as shown in the picture and view its details like the IP Address or MAC Address and even configure the wireless settings like Changing the SSID and Enabling/Disabling the wireless encryption. You can also change the router's password here. Now you nomore need to open the setup page to change the router's password or to configre the wireless settings. It also displays the number of computers and other network devices and their names along with an appropriate icon. You can refresh the page anytime. The refresh button is on the top right hand side. You can kick out any device at any time.
 Follow the Welcome Screen to add a computer or any networking device to the network. If you exit the welcome screen, you can add/remove the computers or devices anytime from the LELA application. To connect any device wireless to the network, you need to know the name of the network (SSID) and the encryption (wireless security). You can view the name of the network from the wireless devices and connect. You can change the wireless encryption anytime, but changing the wireless security setting on the router will affect all the wireless devices connected to the router / modem. You'll need to configure the wireless settings on all the computers/devices connected to the router.
 While LELA was originally designed for Linksys' N routers, it will still work with most of Linksys' G routers. Linksys recommends that you install Windows XP or Vista (x64 and x86) Operating System on your computer. A minimum of 512 MB RAM is required (1 GB is recommended). The network map shows your network devices, the name of your wireless network (SSID), network status, menu options, alerts (if any), and updates (if any). You can manually check for the updates (From network map/list, click on the Updates button, and then select Check for Updates). It also shows you if any unauthorised device is trying to access your network as shown in the picture. You can stop the Internet access to that device anytime. You can even Print the Network Settings. To change the language, On the network map/list, click on File > Preferences > Language. At the initial launch of LELA 3.0, only the WRT160N and the WRT310N firmware will contain HNAP.
How to find the IP Address.
Every computer or device in the network has an IP address, which uniquely defines that device and enables other devices to find each other on the Internet or the network. The IP address format is a string of four numbers, each from 0 to 255, separated by periods, for example, 192.168.1.77
The ipconfig commands displays the information regarding the IP Address, Subnet mash and the Gateway (Router).
How to find the IP Address of the computer running Windows XP ?
Step 1 : Click on Start and click Run.
Step 2 : Type cmd and click OK.
Step 3 : You get the Command Prompt. Wherever the cursor is flashing type ipconfig and hit enter/return.
Step 4 : You get the IP Address as shown in the above figure.
Step 4 : You get the IP Address as shown in the above figure.

Step 5 : If you dont get the IP Address as shown in the figure above, check this page for errors and solutions of the ipconfig command.
Wireless Security
Important tips to secure the Wireless Network on the Linksys Router.
Change the default password of the Router / Access Point :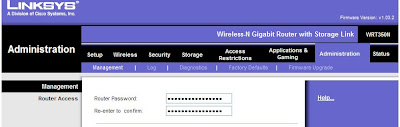
Setup Mac Address Filtering :
Change the default password of the Router / Access Point :
In the setup page click on Administration tab and change the password there, click Save Settings.

Enable Wireless Encryption :
In the Setup page, click Wireless and than click Wireless Security (subtab).
Setup Mac Address Filtering :
Every wireless device has a unique mac address or a physical address. The routers maintains a table that keep track of the mac addresses of all the devices connecting to them. To setup the mac address filtering, on the setup page, click Wireless tab, click Wireless Access (sub tab). By enabling this feature, you can permit / prevent only certain computers' access to the router.
Assign Static IP Addresses to the computers :
By assigning static IP Address to the computer, you wont have to rely on the router's DHCP server. Also you can change the Local IP Address on the router. Remember the IP Addresses that is being assigned to the computers is in the network range of the Local IP Address of the router. After doing this, disable the DHCP on the router. All these settings can be done from the Setup page of the router.
Disable the SSID Broadcast :
If you disable the SSID broadcast the name of the network will no longer be displayed (broadcasted). A wireless profile needs to be created on the computer. Also try not connecting to any free hotspots, as it exposes the computer to security risks. Change the security encryption at regular intervals (eg. after every 2 months)
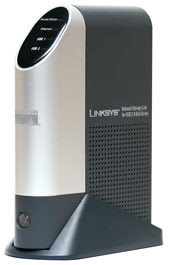
Front Panel & Lights - NSLU2.
Front Panel & Lights - NSLU2.
Front Panel & Lights
Ready/Status This LED will begin blinking when you turn on the Storage Link. This is the Storage Link running a self-test. When this test has completed, the LED will appear solid green.
An Amber LED indicates an error with the Storage Link.
 Ethernet Green. The Ethernet LED serves two purposes. If the LED is continuously lit, the Network Storage Link is successfully connected to a device through the Ethernet port. A blinking LED indicates network activity.
Disk 2 This will light up when a Flash disk or USB hard drive is connected. When the light is blinking slowly, this means the disk or drive can be disconnected. A fast blinking light means data is being transferred over your network.
Disk 1 This will light up when a USB hard drive is connected. A blinking LED indicates network
Activity.
Power Switch The power switch is a "soft switch". If the Storage Link is powered off, you can start it up by briefly pressing the power switch. To power down the Network Storage Link, press the power switch, and wait for it to shutdown and the LEDs to turn off.
NSLU2 !
The NSLU2 (Network Storage Link for USB 2.0 Disk Drives) is a Network Attached Storage (NAS) device introduced in 2004 and discontinued in 2008. It makes USB Flash memory and hard disks accessible over  a network using the SMB protocol (also known as Windows file sharing or CIFS). It was superseded mainly by the NAS200 (enclosure type storage link) and in another sense by the WRT600N which combines a wifi router with a storage link.
The device runs a modified version of Linux and by default, formats hard disks with the ext3 filesystem, but a firmware upgrade from Linksys adds the ability to use NTFS and FAT32 formatted drives with the device for better Windows compatibility. The device has a web interface from which the various advanced features can be configured, including user and group permissions and networking options. It runs on almost all systems. It does not make much noise and can also be used as a Web Server..
T he Default IP Address of NSLU2 is 192.168.1.77. To reset the device press the reset button down for 3 seconds it will beep once to indicate the reset has occurred. The default password is "admin".
Important: Resetting the Network Storage Link will erase all of your settings and replace them with the factory defaults. Do not reset the Network Storage Link if you want to retain the settings. Data on the drives is NOT lost even if the unit is reset to Factory Defaults.
The device includes 32 MB of SDRAM, and 8 MB of Flash memory. It also has a 100 megabit Ethernet network connection.
The Network Storage Link features built-in disk utilities that are accessible through your web browser. You can format a drive for initial use, and scan the disk for errors. If you've installed a second Network Storage Link, you can back up data from one Network Storage Link to the other. You can also automatically back up data to or from a shared folder on a Windows system on your network.
For even more flexibility and utility, the Network Storage Link can be set up to be accessible directly from the Internet, which allows access to stored files via a web browser. Files can be available publicly in your network, or you can create password-protected accounts for your authorized users. You can format new disk drives, and scan drives for errors. The built-in backup program lets you schedule full, incremental, or synchronization backups of your network drives to the Network Storage Link, or vice versa. It will even send you an email message when a hard drive gets nearly full, completely full, or has an error.
 a network using the SMB protocol (also known as Windows file sharing or CIFS). It was superseded mainly by the NAS200 (enclosure type storage link) and in another sense by the WRT600N which combines a wifi router with a storage link.
The device runs a modified version of Linux and by default, formats hard disks with the ext3 filesystem, but a firmware upgrade from Linksys adds the ability to use NTFS and FAT32 formatted drives with the device for better Windows compatibility. The device has a web interface from which the various advanced features can be configured, including user and group permissions and networking options. It runs on almost all systems. It does not make much noise and can also be used as a Web Server..
- USB 1.1 & USB 2.0 compliant
- Port 1: USB HDDs (DOES NOT RECOGNIZE FLASH DRIVES)
- Port 2: USB Flash Drives (detected only by port 2)
T
 he Default IP Address of NSLU2 is 192.168.1.77. To reset the device press the reset button down for 3 seconds it will beep once to indicate the reset has occurred. The default password is "admin".
Important: Resetting the Network Storage Link will erase all of your settings and replace them with the factory defaults. Do not reset the Network Storage Link if you want to retain the settings. Data on the drives is NOT lost even if the unit is reset to Factory Defaults.
The device includes 32 MB of SDRAM, and 8 MB of Flash memory. It also has a 100 megabit Ethernet network connection.
The Network Storage Link features built-in disk utilities that are accessible through your web browser. You can format a drive for initial use, and scan the disk for errors. If you've installed a second Network Storage Link, you can back up data from one Network Storage Link to the other. You can also automatically back up data to or from a shared folder on a Windows system on your network.
For even more flexibility and utility, the Network Storage Link can be set up to be accessible directly from the Internet, which allows access to stored files via a web browser. Files can be available publicly in your network, or you can create password-protected accounts for your authorized users. You can format new disk drives, and scan drives for errors. The built-in backup program lets you schedule full, incremental, or synchronization backups of your network drives to the Network Storage Link, or vice versa. It will even send you an email message when a hard drive gets nearly full, completely full, or has an error.
Validating Identity.

I have a WAG160N. Im able to go online from the computers connected to the modem with ethwrnet cable. However when i try connecting from computers those are wireless, im getting this error : Windows cannot find a certificate to logon to the network.
What do i do ?
Solution :
What do i do ?
Solution :
- Right click wireless connection icon
- Click on view available wireless network
- Than click on change advance settings inte left(SP2) or Advance(SP1)
- Click the second TAB on the top [Wireless networks]
- Clear preffered networks. Click on ADD below preffered network box.
- Put in the details for the titles mentioned below
Association(Tab)
- Network Name (SSID) : Put in your wireless network name
- Data Encryption should be check
- Network Authentication(Shared mode) should be unchecked
- Uncheck the box "The key is provideded for me automatically" and put the network key and confirm it.
Authentication(Tab)
- Check Enable IEEE 802.1x
- Now uncheck Authenticate as Computer when computer info is available
- Now uncheck Authenticate as as guest when user or Computer when computer info is unavailable
- Uncheck Enable IEEE 802.1x
- Click OK. Restart the computer. Should start working.
Also if you change the wireless security to WPA2 Personal, the chances of getting the same error are minimal.
NAS200 - Download Manager !
The Download Manager is designed for users to initiate an FTP or HTTP download using a PC’s Web browser. Once the task is initiated, you may turn off the pc and NAS200 will continue the download independently. For instance if you are downloading a movie, you can use the NAS200 and use the computer for any other use or simply turn it off.
To configure the Download Manager, Open the NAS200 web based User Interface and click on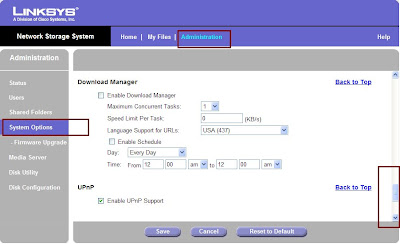 Administration Tab. Than select System Options from the Left Hand Side. Here you can Enable / Disable the Download Manager. If the Download Manager feature has been enabled through the Administration > System Options screen and your login has Download Manager access, then the My Downloads option will also be displayed. On this Page in the Identification settings you can configure the network settings like the name of the device and the Workgroup. In the IP Address settings, you can set the device to either as a DHCP client or assign a Static IP Address. Its always recommeneded to assign a Static IP Address. Than comes the DNS Server settings option. Here too you can select between DHCP and static. Than there is WINS and DDNS that works with TZO. If you dont have an account with TZO, you can signup for one from this Option. Than there is Date & Time where you can enable and configure NTP and also see the status of the same. In E-Mail Alert you can configure upto 3 Emails that will be notified if any problem occurs. You need to specify the SMTP port number. Scheduled Shutdown enables you to schedule a Shutdown [:)]. And you have UPnP.
To configure the Download Manager, Open the NAS200 web based User Interface and click on
 Administration Tab. Than select System Options from the Left Hand Side. Here you can Enable / Disable the Download Manager. If the Download Manager feature has been enabled through the Administration > System Options screen and your login has Download Manager access, then the My Downloads option will also be displayed. On this Page in the Identification settings you can configure the network settings like the name of the device and the Workgroup. In the IP Address settings, you can set the device to either as a DHCP client or assign a Static IP Address. Its always recommeneded to assign a Static IP Address. Than comes the DNS Server settings option. Here too you can select between DHCP and static. Than there is WINS and DDNS that works with TZO. If you dont have an account with TZO, you can signup for one from this Option. Than there is Date & Time where you can enable and configure NTP and also see the status of the same. In E-Mail Alert you can configure upto 3 Emails that will be notified if any problem occurs. You need to specify the SMTP port number. Scheduled Shutdown enables you to schedule a Shutdown [:)]. And you have UPnP.
NAS200
Setting up NAS200.
Network Storage System with 2 Bays.
To access the Setup Wizard, iInsert the Setup Wizard CD-ROM into your PC’s CD-ROM drive. The Setup Wizard should run automatically,and the Welcome screen should appear. If it does not, click Start and then Run. In the field provided, enter D:\SetupUtilizty.exe (if “D” is the letter of your CD-ROM drive). Setting up the NAS200 is very quick and simple as compared to other NAS devices. Don't loose the Setup CD cause you'll need it to configure every PC on your network as well as if you decide to swap out your hard disks for new ones or add a second drive. Fortunately, you can download the entire CD from Linksys' Web site and then simply copy it to a data CD should you ever lose the original. Setup NAS200 Install the Network Storage System for the first time. (The instructions are covered in the Quick Installation.) Set up Computer Configure another computer to use the Network Storage System. Setup Second Drive Add a second hard drive to the already configured Network Storage System. Exit Use this option to close the Setup Wizard. Backup Software Install a third-party program to run backup jobs. Advanced Setup Use this option to access the web-based utility. Install Utility Use this option to install the Network Drive Mapping Utility. User Guide Use this option to open the pdf of NAS200.
Network Storage System with 2 Bays.
NAS200 is an ethernet connected network storage with two available SATA hard drive bays that adds shared storage directly to your network. You can add even more storage with two USB 2.0 ports for hard drive or flash USB storage devices and securely share files locally or through the Internet (FTP, HTTP) with no dedicated PC needed. It also includes an advanced backup software and a built-in media server for streaming to PC or UPnP AV digital media adapter.
To access the Setup Wizard, iInsert the Setup Wizard CD-ROM into your PC’s CD-ROM drive. The Setup Wizard should run automatically,and the Welcome screen should appear. If it does not, click Start and then Run. In the field provided, enter D:\SetupUtilizty.exe (if “D” is the letter of your CD-ROM drive). Setting up the NAS200 is very quick and
 simple as compared to other NAS devices. Don't loose the Setup CD cause you'll need it to configure every PC on your network as well as if you decide to swap out your hard disks for new ones or add a second drive. Fortunately, you can download the entire CD from Linksys' Web site and then simply copy it to a data CD should you ever lose the original. Setup NAS200 Install the Network Storage System for the first time. (The instructions are covered in the Quick Installation.) Set up Computer Configure another computer to use the Network Storage System. Setup Second Drive Add a second hard drive to the already configured Network Storage System. Exit Use this option to close the Setup Wizard. Backup Software Install a third-party program to run backup jobs. Advanced Setup Use this option to access the web-based utility. Install Utility Use this option to install the Network Drive Mapping Utility. User Guide Use this option to open the pdf of NAS200.
Step 1 is the Physical Installation. The Setup Wizard automatically searches for any Network  Storage System on your network. If it is not detected, check its cable connections, and make sure it is powered on. Click Search Again to locate the Network Storage System. Select the appropriate Network Storage System. Click Next. To install the second hard drive:
Power off the Network Storage System. Push together the clips, and remove the lower drive bay door. Lift up the ribbon. Make sure the connector side of the drive faces the bay, and the label side faces up. Make sure the drive is inserted under the ribbon. Push the drive in until it snugly fits in the bay. Replace the drive bay door. Wait until you hear the Network Storage System
beep twice. Then click Next. The NAS200 has an easy array of options for configuring your internal disks. With two disks installed, you can run them as  separate volumes, one large volume or have the two play off each other in RAID 0 or RAID 1 configurations. All this is done in a few mouse clicks. But beware, changing a disk or recovering from a disk crash with a new one means rebuilding the NAS200 from the ground up. So be sure to backup the NAS200 occasionally, too. Once your NAS200 goe through basic setup, you can maintain it or enable advanced features from a Web-based administration console. Or you can simply browse the box using a Web browser, which is especially useful if you've enabled the FTP server option
Firmware Release for WAG160N.
New Firmware Released for WAG160N.
Firmware Version : 1.00.09 (ETSI)
Release Date : 23 May, 2008
Fixes :
- Fixes issue with FTP failure after 2 days.
- Fixes issue with Cisco IPSec client
- Fixes issue with slowdown when using Azureus in MAC OS
- Fixes issue with SIP registeration when WAN IP Address changes
- Fixes issue with WUSB300N client over WPA-TKIP
- Change GUI display
Click here to download the firmware.
WVC54GCA
WVC54GCA : Wireless-G Internet Home Monitoring Camera. Send live audio and video to a web browser anywhere !

- Sends high-quality live audio and video to your network wirelessly – viewable from most web browsers, anywhere in the world
- Built-in video stream encoder and stand-alone web server – no PC necessary
- Security Mode automatically sends email alerts with video clips upon motion detection
- Supports MPEG-4 and MJPEG video at up to 640x480, and up to four simultaneous remote users
WVC54GCA sends live video through the Internet to a web browser anywhere in the world. This compact, self-contained unit lets you keep track of your home, your room, your workplace -- whatever's important to you.
Unlike standard "web cams" that require an attached PC, the Internet Home Monitoring Camera contains its own web server, so it can connect directly to a network, either over Wireless-G (802.11g) networking, or over 10/100 Ethernet cable. Choose either MPEG-4 or Motion JPEG video compression for a high-quality, high-framerate, up to 640x480 video stream.
The Compact Internet Home Monitoring Camera's unique form-factor and wireless connectivity allows you to mount it on a wall nearly anywhere, or slip it into its included stand for desktop use. Once it's connected to your home network, you can "see what it sees" from any PC in the house, while the video stream is secured from the outside world, hidden behind your Router. If you want the video to be visible from outside your home network, you can open an appropriate port on the Router, and then create password protected accounts to manage access to the camera, or leave it wide open for the world to see. The TZO domain service (one-year trial sign-up included) lets you access your camera using an easy-to-remember "name", even if your home Internet connection uses a dynamic IP address.
You can also turn on Security Mode, which tells the camera to send a message with a short video attached to up to three email addresses whenever it detects motion in its field of view. You can then log onto the live video stream if the situation warrants. The included Viewer & Recorder utility lets you record the audio/video stream to your local hard drive, "live" or on a predetermined schedule.
Enabling Email Alerts in WVC200
How to enable E-Mail alerts in WVC200
E-Mail alerts can be enabled from the Options TAB in Setup.
You need the SMTP mail server address to specify the Outgoing server.
You can choose to be notified when the Camera detects motion in its field of view. You will be sent a text-only email or an e-mail with video attached. To get the video in the mails, you need to enable to Email Video
Enable E-mail Alert - If you want to be notified by e-mail when the Camera detects motion, then select Enable from the drop-down menu. Otherwise, select Disable.
NOTE: Motion detection can be triggered by rapid changes in lighting condition, as well as by moving objects. For this reason, it should only be used indoors.
To save your changes, click the Apply option. To cancel any unsaved changes, click the Cancel option. To get additional information about the screen's features, click .
E-Mail alerts can be enabled from the Options TAB in Setup.
You need the SMTP mail server address to specify the Outgoing server.

You can choose to be notified when the Camera detects motion in its field of view. You will be sent a text-only email or an e-mail with video attached. To get the video in the mails, you need to enable to Email Video
Enable E-mail Alert - If you want to be notified by e-mail when the Camera detects motion, then select Enable from the drop-down menu. Otherwise, select Disable.
NOTE: Motion detection can be triggered by rapid changes in lighting condition, as well as by moving objects. For this reason, it should only be used indoors.
To save your changes, click the Apply option. To cancel any unsaved changes, click the Cancel option. To get additional information about the screen's features, click .
WRT600N
WRT600N : A 4 in 1 device.
 Internet-sharing Router and 4-port Gigabit Switch, with a built-in, dual-band, speed and range enhanced Wireless Access Point
Two simultaneous, separate, radio bands double your available bandwidth
MIMO technology uses multiple radios per band to create robust signals for maximum range and speed, with reduced dead spots
Connect a hard drive or flash-based USB storage device to allow access to your music, video, or data files from within your network, or through the Internet
Advanced wireless security and SPI firewall for protection from Internet attacks
The Dual-Band Wireless-N Gigabit Router is really four devices in one box. First, there's the dual-band Wireless Access Point, which lets you connect to the network without wires. There's also a built-in 4-port full-duplex 10/100/1000 Switch to connect your wired-Ethernet devices together at up to gigabit speeds. The Router function ties it all together and lets your whole network share a high-speed cable or DSL Internet connection.
It also includes a Storage Link that lets you easily add gigabytes of storage space onto your network using readily available USB 2.0 hard drives -- or plug in a USB flash disk for a convenient way to access your portable data files. The built-in Media Server streams music, video, and photos from the attached storage device to any UPnP compatible media adapter. And you can get to your files from anywhere in the world through the Internet.
The Access Point built into the Router uses a dual-band version of the very latest wireless networking technology, Wireless-N (draft 802.11n). By overlaying the signals of multiple radios for each band, Wireless-N's "Multiple In, Multiple Out" (MIMO) technology multiplies the effective data rate. Unlike ordinary wireless networking technologies that are confused by signal reflections, MIMO actually uses these reflections to increase the range and reduce "dead spots" in the wireless coverage area. The robust signals travel farther, maintaining wireless connections much farther than standard Wireless-G.
With Wireless-N, the farther away you are, the more speed advantage you get. It works great with standard Wireless-G, -A, and -B equipment, but when both ends of the wireless link are Wireless-N, the router can increase the throughput even more by using twice as much radio band, yielding speeds much faster than standard Wireless-G. But unlike other speed-enhanced technologies, Wireless-N can dynamically enable this double-speed mode for Wireless-N devices, while still connecting to other wireless devices at their respective fastest speeds. In congested areas, the "good neighbor" mode ensures that the Router checks for other wireless devices in the area before gobbling up the radio band.
Since the Router can operate in both the 2.4 and 5 gigahertz radio bands at the same time, it effectively doubles your available wireless bandwidth. For instance, you could set up your network to handle video streaming on one radio band, and use the other band for simultaneous data transfers -- avoiding any interference or collisions that would degrade the video performance.
To help protect your data and privacy, the Router can encode all wireless transmissions with industrial-strength 256-bit encryption. It can serve as your network's DHCP Server, has a powerful SPI firewall to protect your PCs against intruders and most known Internet attacks, and supports VPN pass-through. Configuration is a snap with the web browser-based configuration utility.
The incredible speed of Wireless-N and gigabit wired networking is ideal for media-centric applications like streaming video, gaming, and Voice over IP telephony, and gives you plenty of headroom to run multiple media-intense data streams through the network at the same time, with no degradation in performance. With the Linksys Wireless-N Storage Link Router at the center of your home or office network, you can easily add storage, share a high-speed Internet connection, files, printers and multi-player games, and run media-intensive applications at amazing speeds, without the hassle of stringing wires!
Enabling MAC Filtering in WAG300N
How to enable the MAC Address Filtering in WAG300N.
 Connect a computer to WAG300N.
Open Internet Explorer.
In the Address Bar type : 192.168.1.1 [Default IP Address of WAG300N].
In the Popup for username and password, type admin for username and admin for password [default].
- Once in the setup page, click on Wireless, the second tab on the top.
- Than select Wireless MAC Filter [third sub tab under wireless.
- Here you need to enable the option.
- In the Access Restriction, you need to specify whether u want to prevent or permit the computers from accessing the Internet.
- With firmware 1.01.01, you can list upto 50 Wireless MAC Addresses.
- If you click on the Wireless Client List in the same page, you can see the MAC Addresses of the Wireless [DHCP clients] devices connected to the router.
- The MAC Address is generally located at the bottom of the devices.
WRT150N with DU in U.A.E.

How to configure WRT150N in U.A.E with the ISP DU.
- Connect a computer to WRT150N to any of the 4 ports.
- Most of the times DU doesnt provide a modem cause its not required.
- There is a Ethernet [Cat5] cable that should be connected straight to WRT150N.
- Reset WRT150N for 20 seconds. The reset button is at the rear side of the router.
- Turn OFF the WRT150N. Power it ON after 5 seconds.
- Try Internet from the Computer connected to the router.
- You should be able to go online. You can change the name of the Wireless Network.
- Click on Wiereless Tab and configure the wireless settings there.
- This process applies to all Linksys routers like WRT54G, WRT54GR, WRT54GC, WRT54GL, WRT54GS, WRT100, WRT150N, WRT160N, WRT300N, WRT310N, WRT330N, WRT350N, WRT600N, WRT610N etc.
Wireless Range !
Tips to improve the Wireless Range.
How Can the Range of a WiFi Network Be Boosted? The wireless signal strength depends on many variables. Like the position of the Router / Access Point, interfering devices, thickness of the walls, the adapter/receiver on the computers. We will discuss some factors that will help boost the wireless range and performance.
 The router should not be placed in an isolated part of the house. The router should not be placed near a Television set or any other electronic devise. Avoid placing the router in a cupboard or behind any thing. If the wireless router is against an outside wall of the house , the signal will be weak on the other side of your home. Common sources of interference in residences include brick or plaster walls, microwave ovens, and cordless phones. But there are many other ways to boost the signal of the wireless network. Try keeping the Access Point / Router elevated from the floor and away from any electronic device. Open the Setup page of the Router [the default IP Address is 192.168.1.1] and change the Wireless Channel. Try different combinations to best optimse the
  coverage. For N-Series devices, keep the Radio Band to 40 MHz Channel, Wide Channel to 9 and Standard Channel to 11-2.462 GHz. If you are using a N-Series Access point / Router, also use a N-Series adaptgers to enjoy the N-Series Connectivity. If you place the router is a central position of the house, the wireless range will be covered in the entire house [ofcourse depends on the size of the house] all the devices will be able to connect wireless without any hassel. The N-Series provides a maximum speed of 270MBPS. You can also replace the wireless antennas on the router to boost the range. Like high gain antennas. Or adjust the position of the antenna on the router or the computers to get better reception. Try using a Range Expander to extend the wireless signal. Keep the firmware on the router and the drivers on the adapter updated.
Subscribe to:
Posts (Atom)