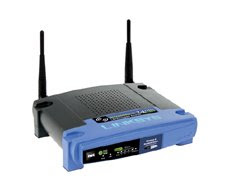
Format Disk.

How to Format Disk with NSLU2.

  • A new USB Disk Drive must be formatted before it can be used.
  • Formatting the Disk will delete all the data on the disk.


Step 1 : Open the setup page for NSLU2. Default IP Address : 192.168.1.77

Step 2 : On the setup page click Administrtation and then Advanced.


Step 3 : In the Advanced Tab select Disk and click Format Disk1 or Format Disk2 whichever is appropriate.


Step 4 : Click Save.

Frequently Asked Questions for CIT400.

Frequently Asked Questions for CIT400.

Does the CIT400 need to be logged into Skype to use the PSTN (Landline)?
No, the PSTN (Landline) will work without Skype being logged in.

Will I be able to listen to my voice mail through the phone?
Yes.

If I am on a Skypeout call and my I receive an incoming PSTN call, will I be able to place the Skype call on hold to answer the PSTN call?
No.

I cannot make a call out through my landline using SkypeOut. What could be wrong?
Make sure that you enter 00,+ or 011 before you dial out. This is required for making calls on SkypeOut.

I seem to be getting poor audio quality, what can I do to make the quality better?
It might be due to to signal interference. There might be some interference from nearby electrical appliances such as microwave ovens and cordless phones or the Base Station is installed in a room with thick walls. It can be that the handset is too far from the base unit. If so, move the Handset closer to the Base Station.

Will I be able to put a Skype caller on hold and call a PSTN line from the same handset?
No, for you to make a call (PSTN) you will first need to hang the Skype call up

Will my Skype contacts be visible through my Skype phone?
Yes, if you go into the Menu option and choose Skype there you will see your contacts.

Can I make an outgoing (PSTN) call on a secondary handset when someone is using the first handset on a Skype call?
To make an outgoing call (PSTN) on a secondary handset when someone else is on a Skype call with the first handset, pick up the second handset and dial out the number. If you hear a busy tone that means that the PSTN line is in use.

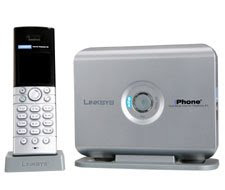
The CIT400H is a handset for CIT400.

Firmware Release for WAG200G.

New Firmware Released for WAG200G.

Firmware Version : 1.01.06 (ETSI)
Release Date : 17 December, 2007

Fixes :
- Fixes security issue with XSS and CSRF.
- Fixes issue with UPnP crash when opening 10+ port forwarding.
- Fixes issue with port 5190, 5566, 4443 opening.
- Fixes issue with DSL performance degradation when running P2P program for long time.
- Fixes issue with Access Restriction
- Use new Cisco/Linksys Logo.
- Added Single Port Forwarding entries to 20.

Click Here to download the firmware.

Configure WVC54GC with Belkin Router !


How to Configure WVC54GC with a Belkin Router.

  • The Linksys camera's Default IP Address is 192.168.1.115.
  • The Belkin Router's Default IP Address is 192.168.2.1
  • First, connect a computer to the camera with an Ethernet cable.
  • Assign a Static IP Address to the computer : 192.168.1.10
  • The Subnet Mask should be 255.255.255.0
  • Default Gateway is not necessary.
  • Open Internet Explorer, in the Address Bar type 192.168.1.115
  • The Username and passwod is admin.
  • On the setup page of the camera, click Setup.
  • Change the IP Address to 192.168.2.115 [ from 192.168.1.115 ].
  • In the Gateway, type the IP Address of the Belkin router [192.68.2.1].
  • In the Wireless settings, put the SSID and security Exactly similar to that of the Belkin router.
  • Network Type : Infrastructure. Save Settings. Remove the static IP from the computer.
  • Powercycle the network. Port 1024 needs to be forwarded on the Belkin router.


It should work. :)


Character Counter

Character counter :


This free script provided by
JavaScript
Kit


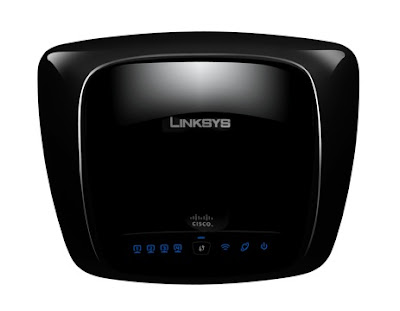
WRT160N

WRT160NUltra RangePlus Wireless-N Broadband Router


  • Internet-sharing Router and 4-port Switch, with a built in speed and range enhanced Wireless Access Point
  • MIMO technology uses multiple radios to create a robust signal that travels farther and reduces dead spots
  • Much faster than Wireless-G, but also works great with Wireless-G and -B devices
  • Wireless signals protected by wireless encryption, and your network protected from Internet attacks by a powerful SPI firewall


How to connect WRT160N with Virginmedia in UK.
  • Connect the computer to any 1 of the 4 ports on the router.
  • Reset the router for 10 seconds. The reset button is located at theback side of the router.
  • The Powerlight on the router starts flashing. Turn the router OFF & turn the modem OFF.
  • Turn the Modem ON first. Wait for 10 seconds. Turn the router ON.
  • Try Internet from the computer connected to the router.
  • You should be able to go online. If you are not abble to go online, Check the following : 
  • The computer is not assigned a Static IP Address. If it is, change the setting to Obtain IP Address Automatically.
  • Also check the DNS is assigned to Obtain Automatically.
  • The connection is done properly.
  • To open the Setup page, the default IP Address is : 192.168.1.1
  • The default password is admin.
  • This process applies to all Linksys routers like WRT54G, WRT54GR, WRT54GC, WRT54GL, WRT54GS, WRT100, WRT150N, WRT160N, WRT300N, WRT310N, WRT330N, WRT350N, WRT600N, WRT610N etc

Firmware Release for WAG54GS.

New Firmware Released for WAG54GS.

Firmware version : 1.01.03
Release Date : 17 August 2007

Fixes :
- Adds languange select option on the Basic Setup page
- Resolves issue with XSS & CSRF security
- Resolves issue with WWW access when static MTU is set
- Resolves issue with UPnP failure with Mac OS Lighthouse application
- Resolves issue with P2P applications
- Resolves issue with E-mail alert characters
- Resolves issue with configuration of multiple Access Restriction policies
- Resolves issue with open ports 4443, 5190, and 5566 during port scan
- Resolves issue with GUI display with Windows 120DPI setting
- Resolves issue with AT&T VPN client

Click here to download the firmware.

Cannot connect wireless with WAG54GS.

Error : Limited or No Connectivity.

This issue is encountered with WAG54GS with any of these firmwares : 1.00.06, 1.00.08, 1.00.00, 1.00.10, 1.00.12, 1.01.00, 1.01.01.

Solution : Upgrade the firmware to 1.01.03.

For instructions on upgrading firmware,
Click Here.

CIT400.

How do i connect the CIT400.

  • CIT400 Requires a Base Station. The base station does not need to be connected to your computer with a USB cable; it just needs to be connected to a router. So now you dont need to wait until your computer turns ON, Skype is already installed on the headset. Just Plug and Dial !
  • You can route calls between Skype or standard telephone line Public Switched Telephone Network (PSTN).
  • It has a Graphical color LCD display. Also has voice encryption for security. 120 hours standby time, 10 hours talk time. Automatic updates on Skype client.

  • You can use maximum of 4 handsets with a single Base Station.
  • The CIT400 needs one (or two) connection(s) to work:
(1) An ethernet connection which ultimately gets its own IP address and provides connectivity to the Internet. You will probably need a router for this connection.
(2) An optional POTS (Plain Old Telephone System) connection - in other words, an wired landline telephone connection.


Connection 1 is necessary if you wish to allow the CIT400 to have access to Skype.
Connection 2 is necessary if you wish to allow the CIT400 to have access to your wired telephone line


To Conference a call :
You can place a conference call with two other callers, if one of the other handsets share your same base unit.
During a conference call, access the Options menu for other functions and features.
1. Call the first Skype contact or landline user through SkypeOut.
2. Press the INT key.
3. Scroll to find the handset you want to include in the call.
4. Press CALL.
5. When the caller on the second handset answers, press CONF. You are now on a 3-way call.


Call Forwarding : Make sure that Call Forwarding is done properly or the handset wont ring and the calls will go directly to Voicemail !
You can redirect Skype calls to another landline or mobile number.
1. Press Menu.
2. Scroll to Settings. Press Select.
3. Scroll to Call Settings. Press Select.
4. Scroll to Call Forward. Press Select. (you will do this twice).
5. Scroll to Yes or Call Forward (if changing the call forward number). Press Select.

How to upgrade the firmware on Linksys routers.

How to upgrade the firmware on Linksys routers.

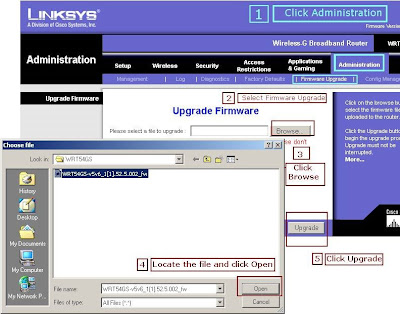
Following are the steps to upgrade the Firmware on Linksys routers.
This process applies to almost all Linksys Products.

Disconnect all wireless clients from the router during the upgrade process. Make sure no wireless clients attempt to associate with the router until the upgrade process is complete.

Step 1 :
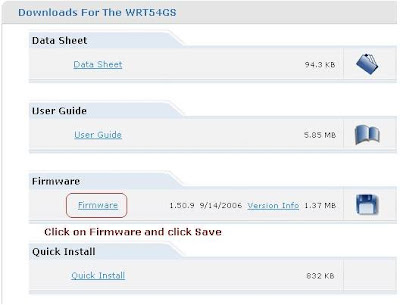
Download the firmware from the Linksys Website and save it on the desktop in a new folder called Linksys. The file might be zipped. So unzip the files first.


Step 2 :
Open the setup page of the router. To open the setup page, open Internet Explorer from a computer connected to the router. In the Address Bar type 192.168.1.1. The default password is admin.


Step 3 :
After upgrading the firmware, reset the router for 30 seconds. To reset the router, locate the reset button on the router and press it with a pointed object when the router is ON.

Step 4 :
After resetting the router, turn OFF the Router and the Modem. Keep them OFF for sometime and then turn the Modem On first, wait until all the lights are solid, then the router.

Step 5 :
And its Done !!!
Hakunamatata !

Change the Language on WAG54GS !

How to change the language on WAG54GS.

  • WAG54GS with firmwares 1.00.00, 1.00.10, 1.00.12 and 1.01.01 tends to change the default language to French.
  • To change the language, open the Setup page, click Adminstration TAB on the TOP.
  • Under Administration there are certain Sub TABs, select Firmware Upgrade [Sixth Subtab].
  • Here you can change the Language.
  • The Best practise is to upgrade the firmware.

Firmware Release for WAG200G

New Firmware Released for WAG200G.

Firmware Version : 1.01.04 (ETSI)
Release Date : 04 April, 2007

Fixes :
- Fixes issue with incorrect upstream/downstream transmit power display on DSL Connection page
- Fixes issue with ATT VPN client not connecting to ATT VPN network
- Fixes issue with Security information disclosure for UDP port scan packet

Click here to download the firmware :

Firmware Release WRT54GC

New Firmware Released for WAG160N.

Firmware Version: v1.05.7
Release Date : 04/12/2007


Fixes :
- Resolves security issue with UDP port 916 reported by Secunia and Daniel Niggebrugge by allowing users to disable the use of the setup wizard.

Click here to download the frimware.

WRT54GR and WRE54G v3.

How to connect the WRE54G to WRT54GR.

WRE54G uses Wireless Distribution System to communicate with the wireless devices.
  • Make sure the firmwares on both the devices are latest.
  • Connect a computer to the WRT54GR.
  • Connect the WRE54G to WRT54GR.
  • On the computer Open Internet Explorer [or any browser].
  • In the address bar type : 192.168.1.1 [default IP Address] a popup should appear.
  • Make sure the Popup blocker is Disabled.
  • The default password is admin.
  • Once in the Setup page click on Wireless [Second TAB on the top].
  • In this TAB you can configure the wireless settings for tyhe router like the MODE, Name of the network [SSID] and the CHANNEL.
  • Whatever settings you do here you need to copy the same on the Range Expander.
  • Minimise the WRT54GR Setup Page. Open a new Internet Explorer.
  • In the Address Bar type : 192.168.1.240 [Default IP Address of WRE54G].
    The default password is admin.
  • Once in the Setup page configure the wireless settings same as that of the WRT54GR.
  • Also if the wireless network is encrypted, do the relevant settings on the Range Expander.
  • Save Settings. Turn OFF the WRT54GR and WRE54G.
  • Place the WRE54G where the signal is weak.
  • Turn the WRT54GR ON wait for 10 seconds.
  • Turn the WRE54G ON. Check the lights.
  • The ACTIVITY led lights up whenever there is a successful wireless connection and will flash whenever there is wireless network activity.
  • The LINK led lights up when the Range Expander is powered ON. This light will appear blue when the Range Expander is connected to a functioning Access Point or wireless router. It will light up RED when there is NO Access Point or Wireless router to connected to or the settings on the RE does not match with the router.

WAG200G

Wireless-G ADSL 2+ Router

WAG200G Features :

  • Supports 802.11g and 802.11b wireless LAN.
  • Built-in ADSL modem with G.lite, g.992.3, g.992.5, G.dmt, and T1. 413 support [Firmware upgrade is required for older devices to get this feature activated]
  • Supports 4 10/100 Auto MDI/MDI-X LAN switch ports
  • Enhanced security management functions: Port Filtering, MAC and IP Address Filtering and wireless security.
  • Build-in web graphical user interface for easy configuration from any web browser
  • Support for RFC1483, 2516 PPPoE and 2364 PPPoA connections
  • Statefull Packet Inspection (SPI) firewall with Denial of Service (DoS) prevention
  • Wireless Access Lists to enhance wireless security
  • Supports VPN Passthrough for IPSec, PPTP, and L2TP Protocols
  • Supports Static and Dynamic Routing (RIP1 and 2)
  • DHCP Server capability to assign IP addresses automatically
  • Supports Remote administration and remote
  • E-mail and Web-based Logging of Security Events
  • Supports traffic and event logging
  • Support for NTP (Network Time Protocol) for Synchronizing with a Real-Time Server
  • Support for Wireless SSID Broadcast Disable

Specification

  • Power 12VDC 1A
  • Standards IEEE 802.11g, IEEE 802.11b, IEEE 802.3u, IEEE 802.3, g.992.1 (g.dmt), g.992.2 (g.lite), g.992.3, g.992.5, T1.413i2
  • Ports Power, ADSL, Ethernet (1-4)
  • Buttons Reset [Also can be reset through the WEB Based UI]
  • Cabling Type CAT 5 UTP
  • LEDs Power, Wireless, Ethernet (1-4), DSL, Internet
  • Transmit Power 18 dBm
  • UPnP able.

BEFSR41.

BEFSR41 : EtherFast® Cable/DSL Router with 4-Port SwitchShare Your High-Speed Internet Connection Throughout Your Home or Office


Connects to a Broadband modem or to an Ethernet backbone;
Equipped with a 4-port 10/100 switch;
Connects all of your PCs to the Internet with only one purchased IP address;
Creates a firewall to protect your PCs from outside intruders;
Configurable through your networked PCs Web browser;
Supports Internet Protocol Security (IPSec) Passthrough;
Remotely administered through your Internet connection;
The switch dramatically speeds up your gaming and multimedia connections;
Can simultaneously act as both Dynamic Host Configuration Protocol (DHCP) server on the LAN and DHCP client on the WAN;
Compatible with virtually all standard Internet applications;
Administrators can block specific interior user’s Internet access; and
Demilitarized Zone (DMZ) host option provides two-way communication between one PC and your Internet services.

Just connect your DSL or Cable Modem to the Router, and all the computers in your household can share the Internet -- all at the same time. The built-in 4-port switch lets you attach four local PCs directly, or daisy-chain out to more hubs and switches as your network grows. Once your computers are connected to the Internet through the Router, they can communicate with each other too, sharing resources and files. All your computers can print on a shared printer connected anywhere in the house. And you can share all kinds of files between computers -- music, digital pictures, and other documents. Keep all your digital music on one computer, and listen to it anywhere in the house. Organize all of your family's digital pictures in one place, to simplify finding the ones you want, and ease backup to CD-R. Play head-to-head computer games within the household, or against Internet opponents. Utilize extra free space on one computer when another's hard drive starts to fill up. You can ure the router in 2 ways : Either from the Setup CD provided in the box or thru the Web based Interface. The default IP Address is 192.168.1.1 and the password is admin.

Settings for Cable and Wireless.

Settings for Cable and Wireless in UK for any Linksys Modem.

Encapsulation : RFC2364 PPPoA.

Multiplexing : VC

QoS : UBR.

Auto Detect : Disable.

VPI : 0. VCI : 38.

Username : is provided by cable and wireless

Password : is provided by cable and wireless.

Make sure Keep Alive is selected. And Save Settings.

WRT54GL with Digiweb !

WRT54GL : Wireless-G Broadband Router.
All-in-one Internet-sharing Router, 4-port Switch, and 54Mbps Wireless-G (802.11g) Access Point
  • Shares a single Internet connection and other resources with Ethernet wired and Wireless-G and -B devices
  • Push button setup feature makes wireless configuration secure and simple

  • High security: TKIP and AES encryption, wireless MAC address filtering, powerful SPI firewall

How to connect 54GLwith Digiweb in Ireland.

  • Connect the computer to any 1 of the 4 ports on the router.
  • Reset the router for 10 seconds. The reset button is located at theback side of the router.
  • The Powerlight on the router starts flashing. Turn the router OFF & turn the modem OFF.
  • Turn the Modem ON first. Wait for 10 seconds. Turn the router ON.
  • Try Internet from the computer connected to the router.
  • You should be able to go online. If you are not abble to go online, Check the following :
  • The computer is not assigned a Static IP Address. If it is, change the setting to Obtain IP Address Automatically.
  • Also check the DNS is assigned to Obtain Automatically.
  • The connection is done properly.
  • To open the Setup page, the default IP Address is : 192.168.1.1
  • The default password is admin.
  • This process applies to all Linksys routers like WRT54G, WRT54GR, WRT54GC, WRT54GL, WRT54GS, WRT100, WRT150N, WRT160N, WRT300N, WRT310N, WRT330N, WRT350N, WRT600N, WRT610N etc

Ayboll