The Cisco Valet Connector helps you connect your computer to a Valet wireless network or any other wireless network for quick Internet access. Installing the Cisco Valet Connector is fairly easy. Just follow the steps below in setting up your Valet Connector on your computer or laptop.
Minimum sysem requirements
- A Computer with 1 GHz or faster processor.
- 512 MB or more RAM.
- An Available USB port.
NOTE: The Valet Connector (AM10) is supported for Windows 7, Vista SP1 and XP SP3 but NOT for Mac.
- A Computer with 1 GHz or faster processor.
- 512 MB or more RAM.
- An Available USB port.
NOTE: The Valet Connector (AM10) is supported for Windows 7, Vista SP1 and XP SP3 but NOT for Mac.
Step 1:
Connect the Valet Connector to a USB port on your computer or laptop.
Alternatively, you can also use the USB Extension Base to connect the Valet Connector. Plug the Valet Connector into the USB Extension Base and connect the Base to a USB port on your computer or laptop.
Step 2:
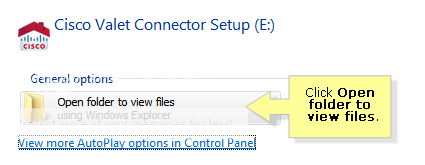
Click Set up your Cisco Valet Connector. Proceed to Step 4.
If you do not see this, click Open folder to view files.

NOTE: For ease of use, the Valet Connector comes preloaded with its installation software. The installation files are stored on the Valet Connector's built in flash storage. However, once Cisco Connect has been successfully installed, this storage facility will no longer be accessible.
Step 3:
Double-click the setup screen as seen in the below image.

NOTE: For Windows XP, the file may be known as Setup.exe. You are not advised to delete any of the files within the AM10. The adapter is not recommended to be used as a USB flash drive.
Step 4:
Read the License Agreement and click Next.

Step 5:
The following screen appears. Wait a few moments while the setup software is setting up your Valet Connector.

Step 6:
If you have an Easy Setup key, select Yes, I have an Easy Setup Key and click Next. Proceed to Step 9.
Otherwise, select No, I don't have an Easy Setup Key and click Next. Proceed to Step 7.

Step 7:
Select your wireless network and click Next.

Step 8:
If prompted, enter the wireless password for your network. Proceed to Step 10.

Step 9:
Follow the on-screen instructions. Click Next once you have completed the on-screen instructions.

Step 10:
The installation is complete when you see the following screen. Click OK.

Step 11:
You are directed to the Cisco Connect screen. Click Close to exit.

No comments:
Post a Comment